

Starlink Satellite Internet
This post was first published 29th November 2022, less than 24 hours after setting up Starlink for the first time. At that time I was really, really happy with it (and many months later I still am in case you are wondering) but it was also only temporarily installed. As time goes on I will add bits and change things and I will come back and update the post with the changes and upgrades we make along the way.
Firstly and most importantly, Starlink are now offering you and me a free months access when you sign up with a referral code from an existing user! So please feel free to click this link to start your order to get a free months access! This will also be a lovely way to thank me for the work in building this page 😁
If that link doesn’t work, try copy and paste:
starlink.com/?referral=RC-177686-14696-28
or as a last resort use referrer code RC-177686-14696-28)
NOTE: This is only valid for Australian and New Zealand new customers.
Upon first setting it up, we had several video conferencing calls for work and made phone calls all day using Voice over WiFi on a Telstra, an Optus and a Vodafone phone, all that were out of service in the area were were staying. Absolutely brilliant. If you are wondering, just make sure your phone is set to allow Voice over WiFi and let the phone sort out the rest, it’s that easy. (Of course this is dependent on your phone brand/model and your reseller, though most resellers now support this).
UPDATE: As I continue add updates this post is getting longer and longer. So here is an index to help you jump to the section you are interested in, or just scroll down and read the lot!
- Unboxing
- Which Version should I get? – Updated with new names and rules May 2023, added new billing date changes October 2023
- NEW Gen 3 / V4 hardware released
- What Hardware do I get or need? (Updated with brief info on Generation 3 to be available early 2024)
- Initial Setup
- My Thoughts
- Price Breakdown (comparison of Starlink to what we had)
- Changes to be made
- Update 1 – Dec 3, 2022 – installing cable through boat bung
- Update 2 – Dec 30, 2022 – Starlink Contact Details.
- Update 3 – Dec 30, 2022 – Obstructions and Weather..
- Update 4 – Jan 5, 2023 – Inverter installed and testing power draw
- Update 5 – Jan 24, 2023 – Telescopic Pole and mount adaptor
- Update to In Motion – Apr 17, 2023 – New In motion system announced
- Update 6: Changed to 12v, yep..
- Updating your Address using Google Plus Codes
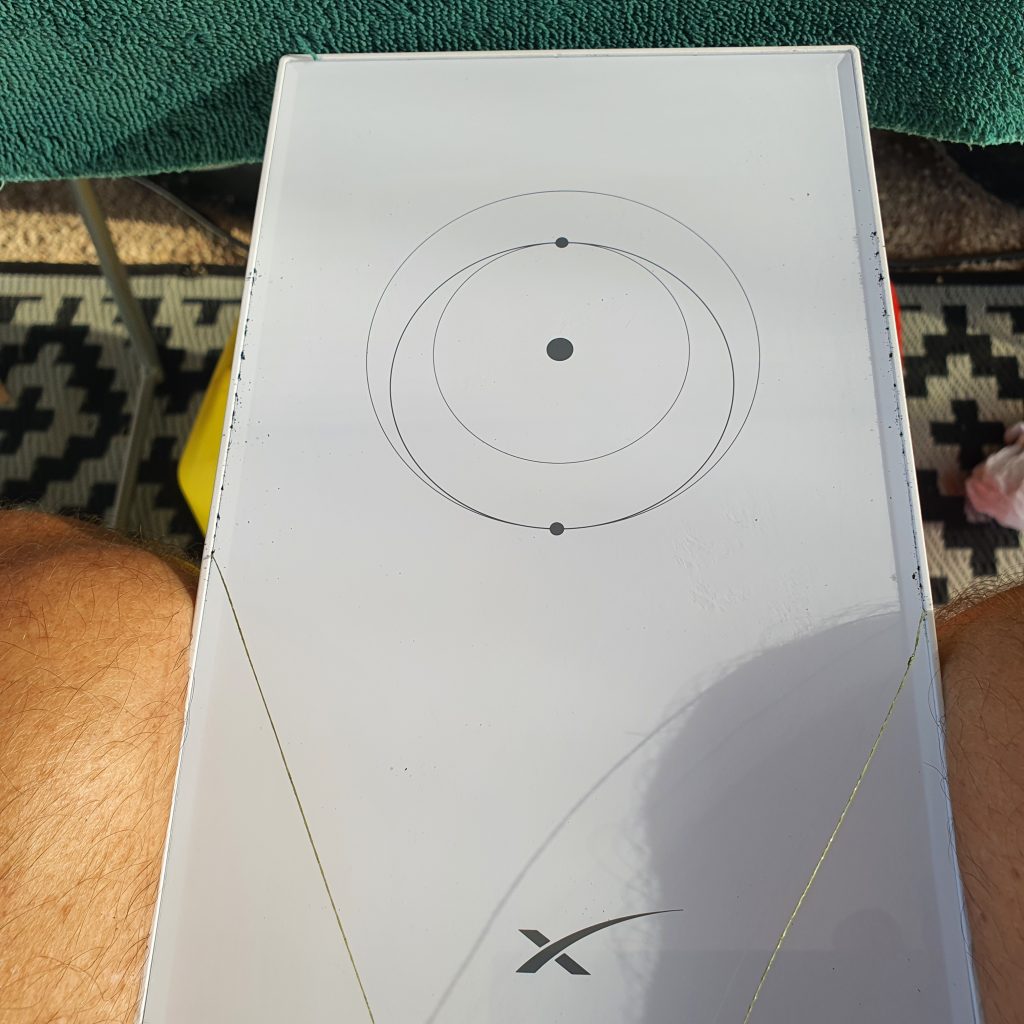
It finally arrived! I think it travelled more than we did over the last month thanks to some issues with Australia Post, but it’s here now and time to set it up and see how it all works.
Lets do a really boring un-boxing first. There was nothing removed prior to recording this – nothing had protective plastic coatings, no plastic bags, no cable ties, just dropped into the box, the box taped shut and sent!
Like I said, pretty boring!
Which Version should I get? (Back to Index)
Starlink currently have (as of 27th September 2023) 3 regular versions for Australian normal users, the Standard (Residential – fixed address), the Mobile Regional (was called RV, then Roam, aimed at the Recreational Vehicle crowd) and the new 40GB Priority Plan. Now by versions I should clarify, they are all identical hardware. The hardware as you would have seen in the unboxing above is just the Dish, the white Router and the shielded Cat5E cable with proprietary plugs on the ends, that’s it.
Update! As of May 2023 we have had several name changes, Residential has changed to Standard, RV changed to Roam, then from Roam to Regional, then from Regional to Mobile-Regional… Hard to keep up with! And now a new 40GB Priority Plan – see further down for details.
Standard (was called Residential) is geo-locked to the address on your account (means it can’t be moved without updating the address), gets priority downloads over the RV version and is currently AU$139 per month. If you wish to relocate the unit you can, you just jump into the Starlink app and enter your new address. In some locations where the service might be over subscribed you may not be able to save this new location yet and might have to turn on Portability (covered below). If your address is not coming up, simply open Google Maps and drop a pin on your exact location and it will provide you with a Google Plus Code. Copy and paste this in, works perfectly (there is a video a few sections down now on how to do this). This congestion has not been a huge issue yet in Australia but has been affecting many areas in the US (EDIT: As at 25th January 2023 cells in Perth, Melbourne, Sydney and Gold Coast to Sunshine Coast are now on a wait list – update, 3 weeks later and they were all clear again – update again early May 2023 there are now 8 cells on wait, each cell is only 22km across so its not a big deal) .
Portability If you wish to go on the road with it you can simply activate Portability through the app and you will be charged the same as the RV version (currently $174 per month) and can now use it anywhere in Australia. When you return home to the registered address you simply turn off Portability. If you travel to a certain location for weeks or months at a time, you may be able to stay with Residential and simply update your location – there is no limit to how often you do that.
Portability has been withdrawn as of March 2023…
Mobile-Regional (was called RV, then called Roam, then Regional, now Mobile-Regional) is able to be used when stationary anywhere in Australia (or the country you bought it if you happen to be reading this from a different country), is currently AU$174 per month and has a lower priority for the data. So when you rock up to a highly populated area like a city and there might be a lot of Starlink Residential fixed address users in the area, they will get higher priority, so if the network becomes congested your speeds will suffer before the Residential version. The RV version is able to be ‘paused’, so if you only travel a few months of the year you can pause the service for $0 a month whilst you are not using it, then un-pause when you are ready to travel again (make sure to pause more than 7 days before the end of the billing month). Since the RV is the same hardware, it is also 240v mains powered, so will require an inverter to run from your batteries when on the road – I cover what I have done in Update 4.
A recent upgrade to the Starlink billing system now changes the way your account reacts to pausing and un-pausing. Previously when you paused, providing it was more 7 days before the end of your current billing month the pause took place at the end of your billing, no change to that. However previously when you un-paused a new billing date commenced on that day. Now with the billing system updates your billing date will always remain your billing date, when you un-pause you will be billed pro-rata for the remainder of your billing month. For example, if you have 9 days of the 31 day month remaining, you will be charged 9 / 31 x $35 = $10.16.
Previously, when we had Portability, you could change only from Residential (Standard) to RV/Roam (Mobile Regional) but not back again. With the new updates and loss of Portability, we now can change back and forth between Standard and Mobile -Regional. The only caveat of course is there must be space available at the new location (or your home location if you changed to go away travelling and now came back home).
So which should you get? In hindsight as we are on the road full time and won’t need the pause option, I should have gotten the Residential version and turned on Portability if needed, or just updated the Residential Address since we tend to stay in one spot for a few weeks. Now you also have the option to go back to Residential if you want as well. (Now that you can change between the two plans we have just done this, and update the address each time we relocate – I have a video tutorial on an easy way to update the address below – NOTE: on 5th June 2023, 3 weeks into our regular billing month and changing address for the 4th time, after 18 hours we still have the message saying we are not at the service address. Have initiated a ticket with Starlink and am awaiting an answer – however may have to change back to Standard as we need internet for work! Update: we had to change to Mobile-regional to get internet for work and the net result of the ticket with Starlink was it ‘should’ change is around 15 minutes, but sometimes might take 24 to 48 hours, and there is no limit to how often you can change address at this time (June 2023).
Other versions: There is a business version in Australia currently, a larger dish for better connection and faster speeds again, however very expensive! ($3,740 hardware purchase and $750 per month – Feb 2023 dropped to $375 per month). Starlink Maritime and Aviation not currently available to order in Australia, but similarly priced. UPDATE, the Marine version is now available, more info below.
Using whilst moving: The standard dishes have a motorised mounting pole to allow the dish to self rotate to face south and down 30° from vertical for the best connectivity and to avoid as best as possible the fixed orbit satellites of other services. To use it when moving you can modify the dish by disabling the motors or removing the mounting pole and flat mounting etc., however Starlink do say in their terms that motion above 16kmh may cause the system to shut down (they have been trialling this in the US). Once the ‘in motion’ version is officially released here (think similar prices to the Business system), this may be activated in Australia so use whilst moving will be blocked anyway.
IN MOTION UPDATE April 2023: Starlink have now released the Mobile version for use whilst in motion – this is based on the Business hardware (larger dish) and is fitted into a Wedge Flat Mount. Only this Wedge Mount version will be allowed to be used whilst in motion, all other hardware versions will be blocked when in motion as mentioned above – hardware cost the same as the Business System ($3,740) but the monthly cost is now $374 (price for business has recently halved). Available only from Business System resellers in Australia. Update May 2023 – Mobile version can now be ordered through Starlink for the same $3740 but can be used on the $174 pm Mobile-Regional plan for use whilst in motion.
MARINE USE UPDATE the Marine version is now available but has very low data allowances (50gb) for quite high prices. People who have been using the roaming version off shore have now been issued notice from Starlink that they need to cease use at sea or upgrade at minimum to the MOBILE PRIORITY – 50GB Plan at $374 per month, which includes use at sea. Yep, that’s only 50GB a month for $374… Based on the account info wording, after the 50GB priority data has been used on Land or Water, you have unlimited Standard data on Land, ie, no further usage at sea. There is then optionally a 1TB for $1486/month, or a 5TB for $7433 per month, yep, they are expensive..
Hope that helps explain the different versions, at least until the next major changes they make!!! I will look at the hardware next.
New 40GB Priority Plan (ideal for Small Business) 27-09-2023: Starlink is now offering a new service plan for the standard dish for A$230/mo. The 40GB Priority plan includes unlimited Standard Data (same as the Residential offering today), along with priority support, public IP, a dashboard, and 40GB of high network priority data.
Billing changes (October 2023): previously when you ordered from Starlink, billing commenced 14 days after it was dispatched. Now billing commences as soon as you activate it for the first time, or 30 days after dispatch if not yet set up.
Feb 2024 now have Rental: Starlink now provide a rental option, offering the hardware for $0 upfront and adds $19 a month to the service fee. Based on the standard $139 plan and normally $599 purchase, (Rental not available for any Roam plans currently) this means its cheaper until you have it for more than 30 months.
What Hardware do I get – do I need any extra bits to make it work?: (Back to Index)
Well this is a tough question to answer as everyone’s use-case will be different. For us for example, we are in a Caravan and all our devices are wireless and we are always within a few metres of the router.
So what comes in the kit? We looked at the un-boxing previously, and as you should have noticed it comes with a wireless router with a mains power cord (the router is also the power supply for the dish), the Dish (which is also effectively the modem and is locked to your account), and a cable to link to the two together (using a Starlink proprietary plug that looks like a miniature HDMI cable). The WiFi range from the router is not huge and in a small caravan it works great, in a large home would most likely not suffice. One tip for the WiFi is to ‘split’ the 2.4 and 5 gig WiFi networks in the app and give the 2.4 a new name. The 2.4 will give a lot better range but a much lower data speeds, the 5 will give much higher data speeds but much shorter range. With them split, you can decide which you want to connect to.
What options are there? From Starlink, you can buy a mesh WiFi extender (same as the standard supplied router but simply adds as a wireless repeater) and an Ethernet Adaptor.
The Mesh repeaters from Starlink are by far the easiest way to improve the range, they simply require a power point that’s located within range of the existing router or Mesh point and to be added from the Starlink app. Currently there is no limit listed to how many you can add.
The Ethernet Adaptor is connected by first removing the Dish-to-Router cable from the router end, plug that cable into the Ethernet Adaptor and the fly-lead from the Ethernet Adaptor into the now empty hole on the Router, Done. You now have an Ethernet port where you can plug a data patch lead into and any other device. Most people would connect this to a data switch to enable connection to other hard wired devices.
Other options I won’t go into include using your own router and disabling the Starlink Router, or even replacing the Starlink router and using separate power supplies etc. For this sort of setup you will either already know how to do this or can do some more research!
New Release: As of January 2024, a new model commonly referred to as Generation 3 is slowly being released in the US and expected to be available in Australia early 2024. This has a slightly larger dish and no motors to align it, just coming with a small tilt stand. The new router is WiFi 6 compliant for better range and security and includes 2 Ethernet ports (Someone was listening). The cable has changed to a slightly modified RJ45 which at first appearance looks like it wont interchange with a normal RJ45, but testing by others is showing it will work. More info below.
Generation 3 / Version 4 Hardware released! (Back to Index)
On the 9th MArch 2024, they finally released the new Gen 3 / Ver 4 dish and router in Australia. Its V4 as there were two versions of the first generation round dish. The reason this has come up recently is whilst Starlink have always referred to the Generation number, other retailers for some reason have been advertising the Version number!
What is the new generation? First off, the dish is similar shape but around 25% larger and provides around 25% faster speeds due to having more antennas. Pricing is the same as the previous, however it no longer has a pole and motors, just comes with a small stand to lift one end of the dish, the other end sits on the ground (looks like a small ramp!). To mount on a pole will require an additional clip in mount, Starlink provides these but the first batch were recalled as they didn’t work properly. There is also some aftermarket ones available. This will make the initial installation for many people a pain as the standard kit can not be set up on a pole for a roof mount.
The cable has gone back to a Shielded RJ45 connector (with a Starlink proprietary twist, but a standard RJ45 will work) making it a lot easier for caravan mounting. The new router is now WiFi 6 compatible and has 2 Network ports available so no ethernet adaptor is required.
Without motors to self align the dish, the user is now responsible for doing this manually, many see this as a step backwards. The Starlink app provides a graphical guidance on aligning the dish, showing where it is now and where it should be for ideal operation. However, as many have found, flat mounting the dish and having it pointing in any direction has made little difference in the speeds obtained or the reliability of the connection, especially now we have passed 4000 satellites in operation.
As I personally dont have this dish I will not post much more info for now, if I do get one in the future I will upgrade the post (I am still travelling and have been advised that Home now has Fibre to the Home available which will outperform Starlink at a lower price!).
Setup: (Back to Index)
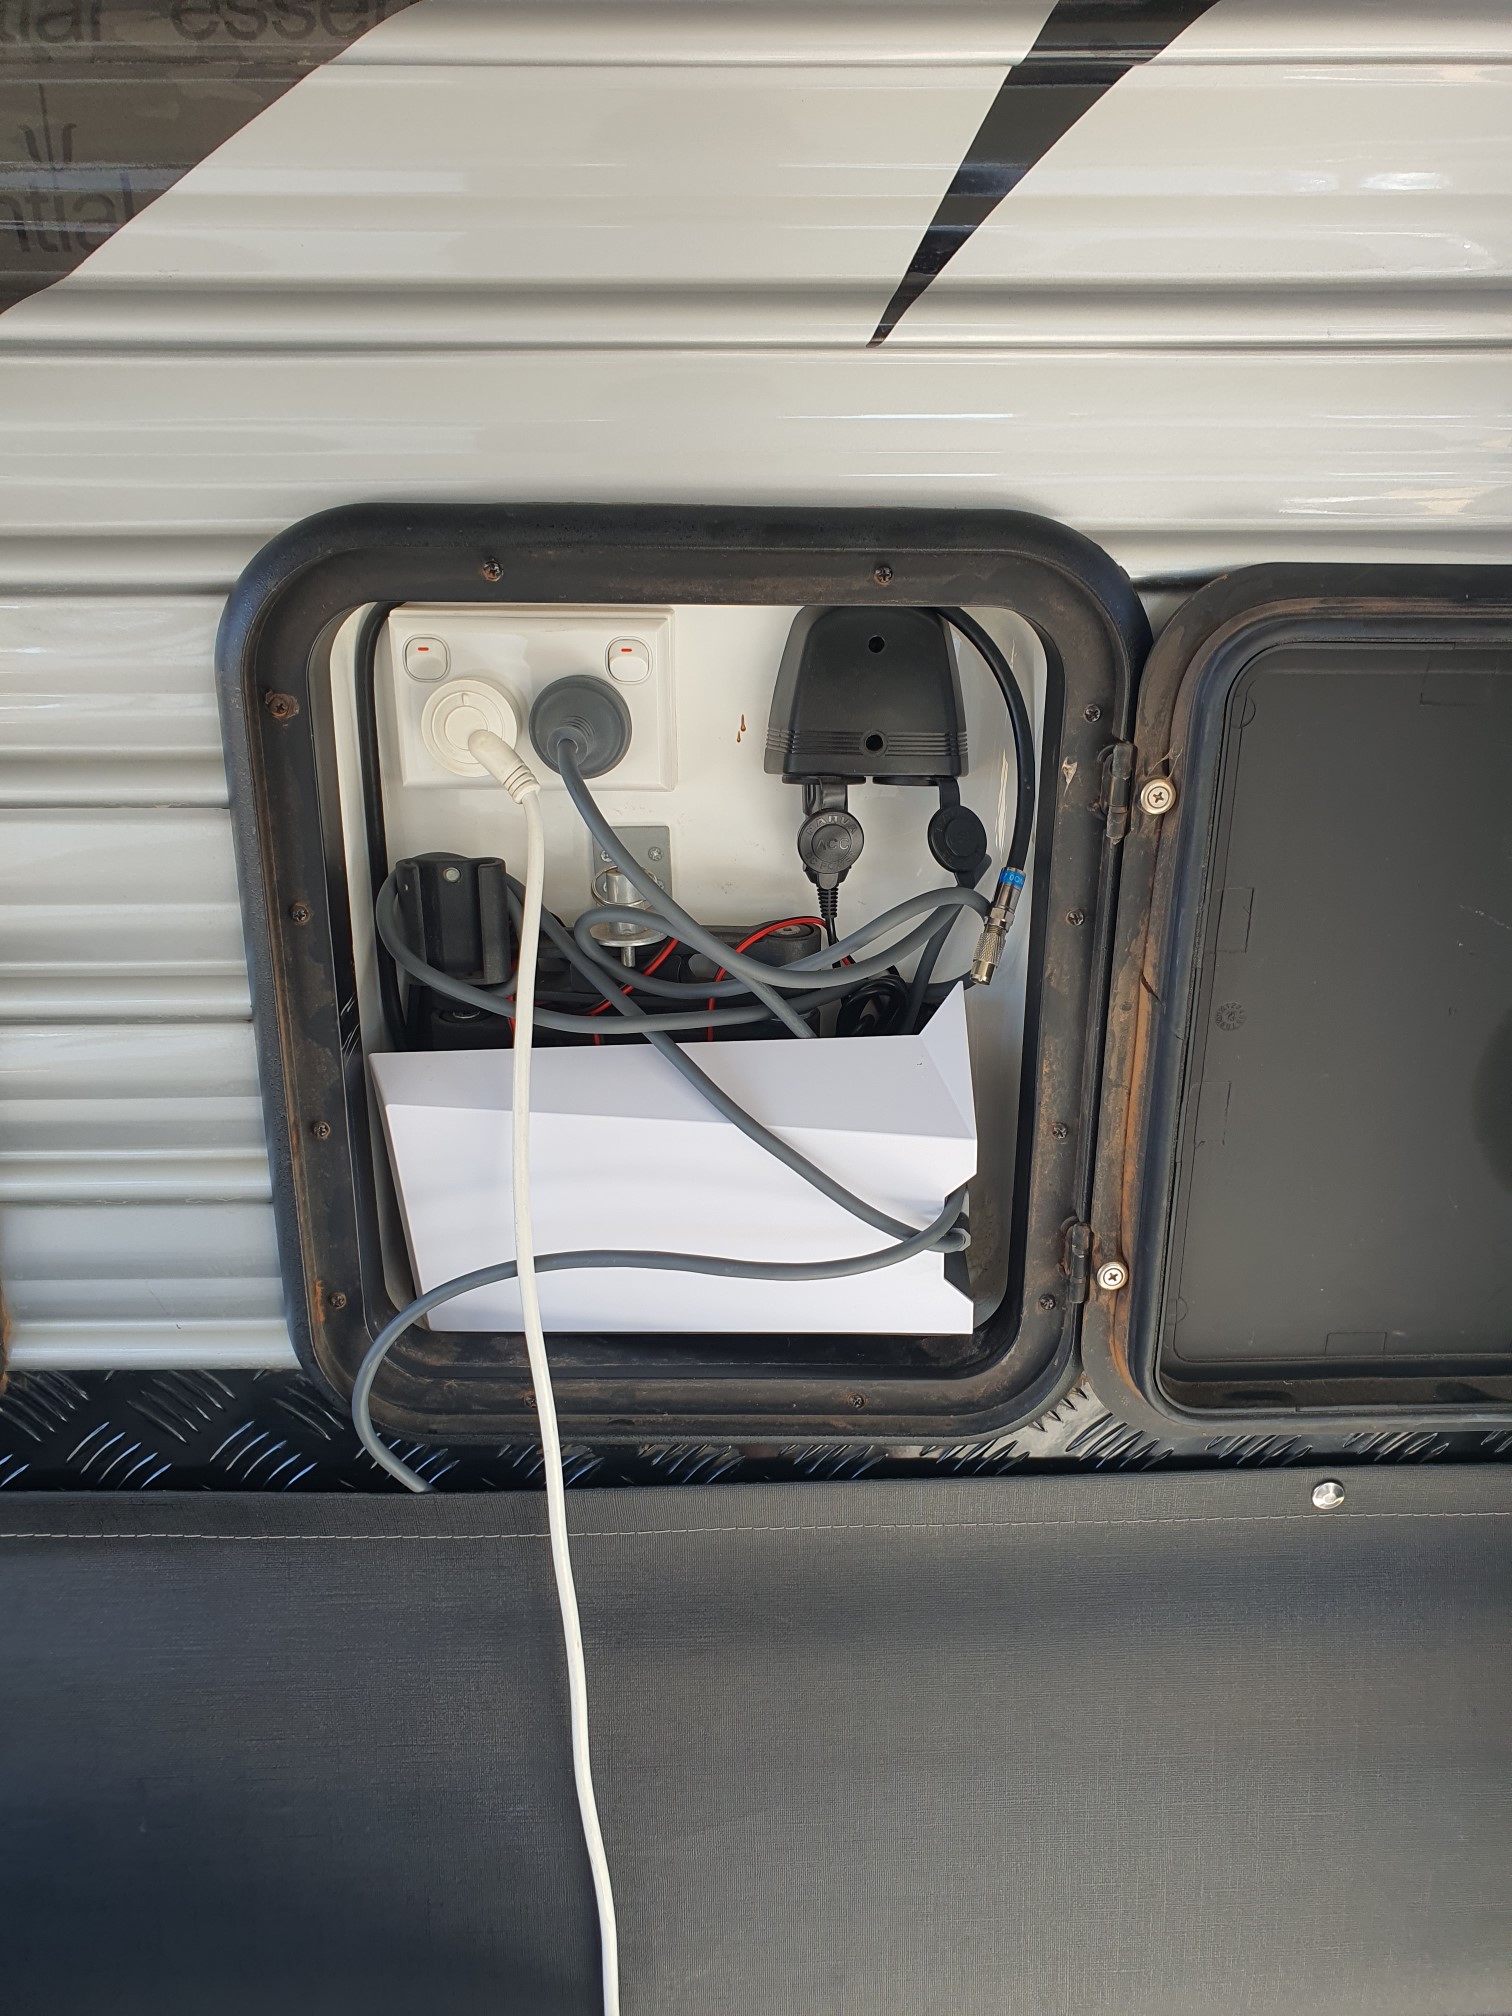
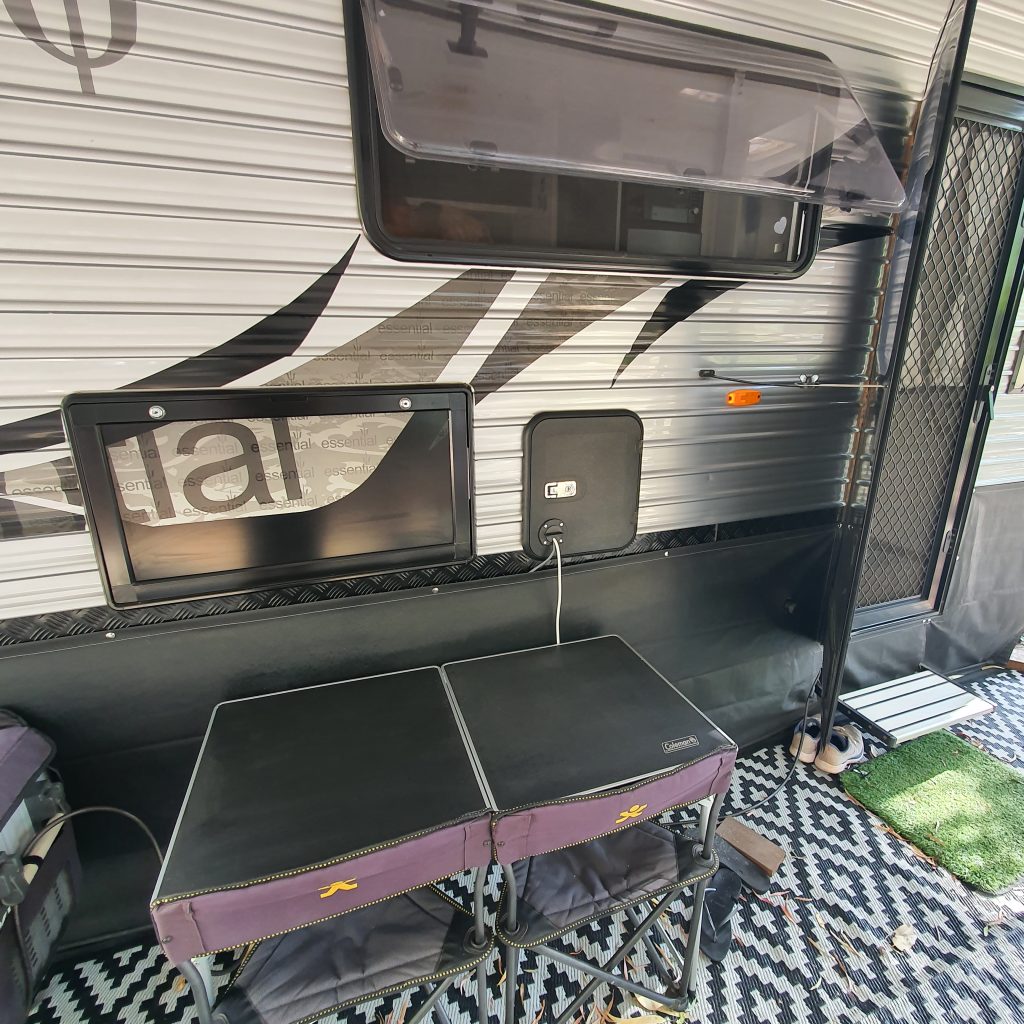
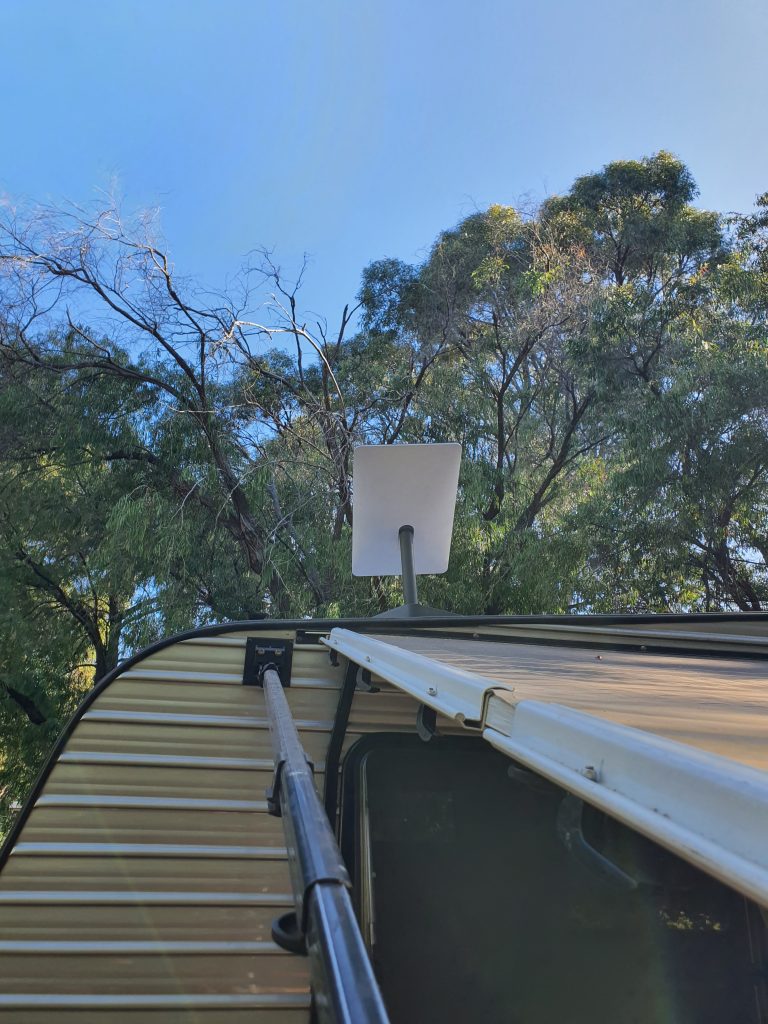
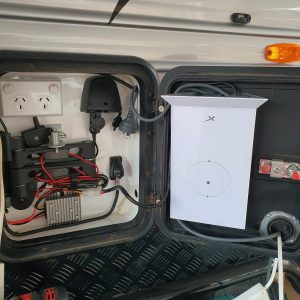
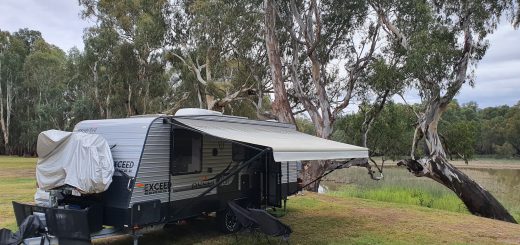
So how did I set it up? I simply sat the dish in the stand (the cable was already plugged into the dish), sat that on the roof of the caravan, sat the router on it’s side in the outside TV cabinet on the side of the van (only just fit), plugged in the power cable then turned it on.
Yep, that was it.
Oh, I did use a couple of short pieces of rope from the dish base to the rear view camera and awning mount just to be safe, you can’t tell in the photo but we had 40 to 60 km/h winds coming from the direction the dish is facing and I didn’t want my new dish flying away.. In hindsight, it probably would not have moved, it’s reasonably heavy and sits pretty good.

Once I turned it on, I walked to the back and started recording to see how long it would take. It was probably 10 seconds after hitting the power point switch, at the 45 second mark in the video the dish fires up.
I haven’t edited the video, that is recording from about 10 seconds after turning on the power point. After I stopped recording I immediately opened up the Wi-Fi connections on my phone and there was a new network called Starlink (apparently it’s usually called Stinky to ensure you change it!)
I connected to the new network, opened the Starlink App (I had already downloaded that) and it prompted me to set a network (wireless) name and password. Did that, it rebooted then an estimated 2 minutes later I was on the Internet – that’s it, done!
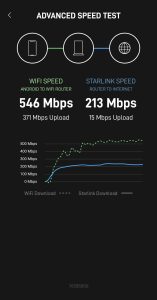
This was the first speed test – dish was still pointing straight up, the first figures are phone to router, the second set are router to Internet.
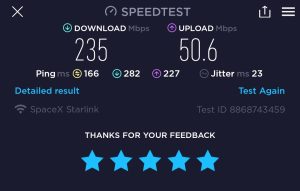
This speed test is from my computer, a couple of hours later after the dish has settled to pointing south at around 30° down from horizontal and we are in Kalbarrie WA.
My thoughts? (Back to Index)
So would we recommend Starlink – well after our first day of using it, voice calls on the Vodafone handset through the Wi-Fi all day and clearest they have ever been, 2 computers all day, a Zoom meeting, watching streaming TV last night, ease of set up – yep, it just works. I would highly recommend it for an Internet service, this may not be for everyone of course, but for us it is justifiable – see the price break down below for my reasons there. If you have access to a good working internet connection that’s stable and providing 50Mbps or greater downloads, it will likely be far cheaper and have lower latency than Starlink. But if you are not able to get that, then you are what this product was designed for.
UPDATE a month later: still extremely happy with it! UPDATE to the update: Over a year later now, we have now travelled the length of WA, across the Nullarbor to Adelaide and now in southern Victoria at Cape Otway and it has been brilliant the whole way. Many days of 8 hour long video meetings, many phone calls in non-reception areas etc.
UPDATE 18 months later: Yep, no brainer. We have actually made an emergency 000 call for a snake bight from a King Brown at Sandy Cape WA camp ground where there is no mobile reception. This litterally saved the lady’s life and it was still touch and go for a few days. As for work, we have still been working 3 days a week and currently in Tasmania with no mobile reception yet making heaps of phone calls much to the surprise of those camped around us!
Price breakdown: (Back to Index)
For us, we currently use Telstra mobile data for work while we travel, one phone on a Telstra $89 / 300 gig plan, a Hotspot on the same Telstra account on a $25 / 30gig plan ($113/m and 330gig data), an Optus mobile on a $55 plan plus a $49 phone repayment for total of $217 per month. We will cancel the hotspot (just did that a couple of hours ago), payout the last couple of months of one phone, change both phone numbers a to Boost Mobile $200 / 12 month prepaid plan that includes 160gig data each ($17 a month each and the data will be used when away from the van). That comes to $34/m plus Starlink $174/m total $208/m. So yes, the Starlink is not cheap at $174 a month, but our new monthly cost has actually dropped $9 a month!
But… and there is always a but.. we now have 100% of Australia covered for data and voice instead of 27% that Telstra offers, and, we can now stay out of town away from the ‘good’ mobile coverage areas in cheaper parks or even free camps, potentially saving $hundreds per week (parks are averaging $45 to $55 a night now for basic ones, fancy ones even more.)
Changes I have planned: (Back to Index)
Yes I will make some alterations as we go. I am looking at a way to easily have the cable exiting the TV cabinet so I can lock the door for security while using it (see Update 1 below) and also looking at options for pole mounts to get the dish a little higher for clearing trees etc. (see Update 5 below). The dish needs a 100° clear view from the angle its facing. Based on the angle its sitting on, that means it needs to see from the horizon straight out to just behind straight up and around the same either side.
Planned Mod 1. I have ordered a 45mm black nylon boat bung that’s waiting at the post office. That will get fitted in the cabinet door. I went that large as I usually have a power board hanging out the door as well to run the laptops. The router will get stepped to the door upside down for easy access to the cable to unplug for travel. (Finished – see Update 1 below)
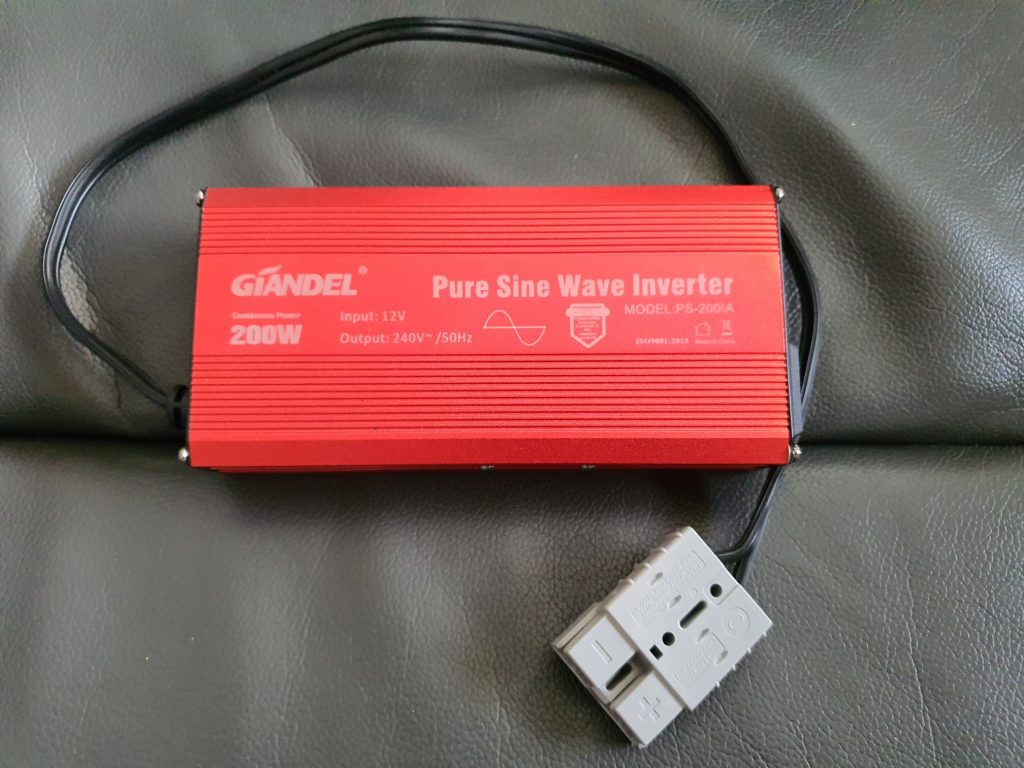
Planned Mod 2. Awaiting delivery of a Giandel 200w (400w peak) inverter to run the whole thing. As there is no dedicated off the shelf 12v power option (yet, there may be something coming from after market, however since the current router is the power supply for the dish it would require cutting cables, fitting RJ45 plugs and probably a different router). I will fit this in the cabinet and wire it in via a switched Anderson plug so I can shut it off over night when running on battery. For those who want to know, Giandel have been around over 10 years, I have been using a 3000w (6000w peak) for over 2 years and works fantastic but draws too much in overheads to just run the Starlink. I may down the track look at modifying it to run directly from 12v, we will see about that!
Planned Mod 3. Deciding on a pole, but will probably end up with one from TelcoAntennas.
Update 1 (Dec 3, 2022): (Back to Index)
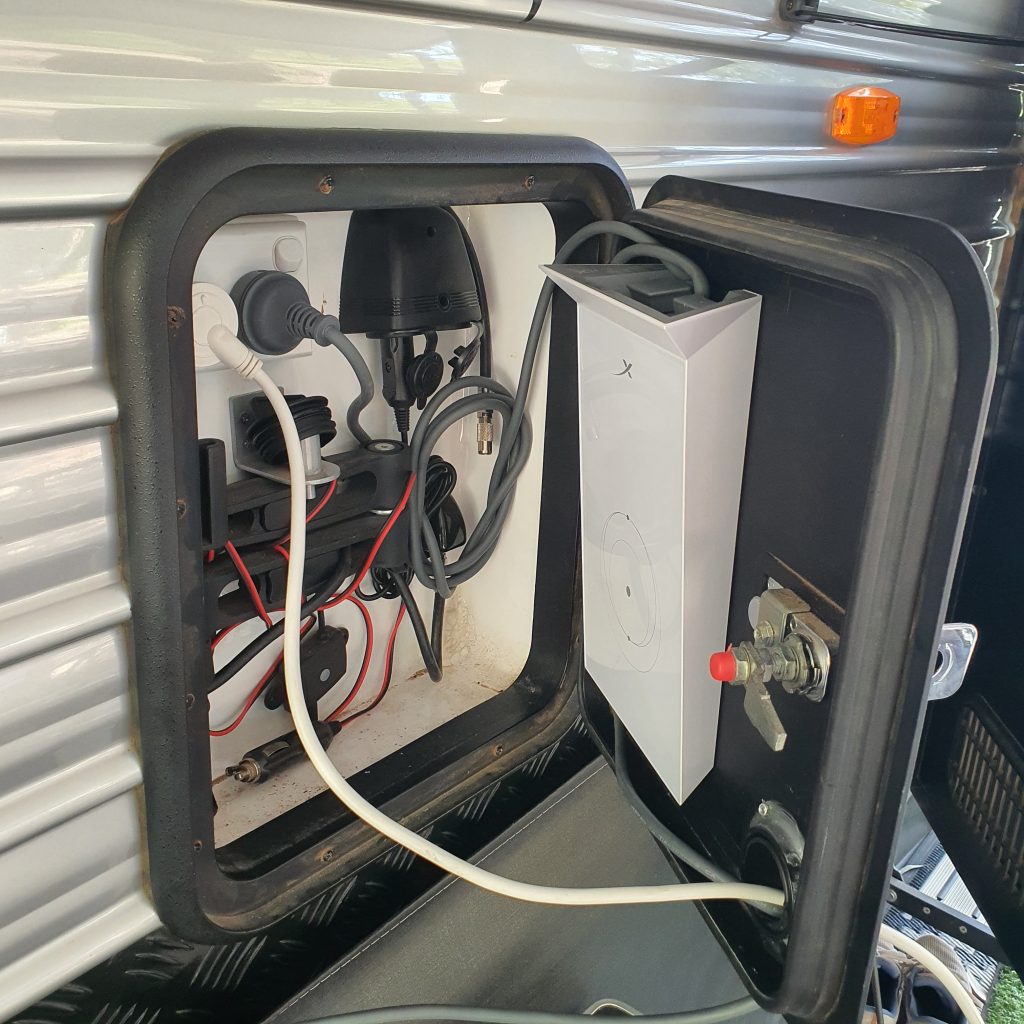
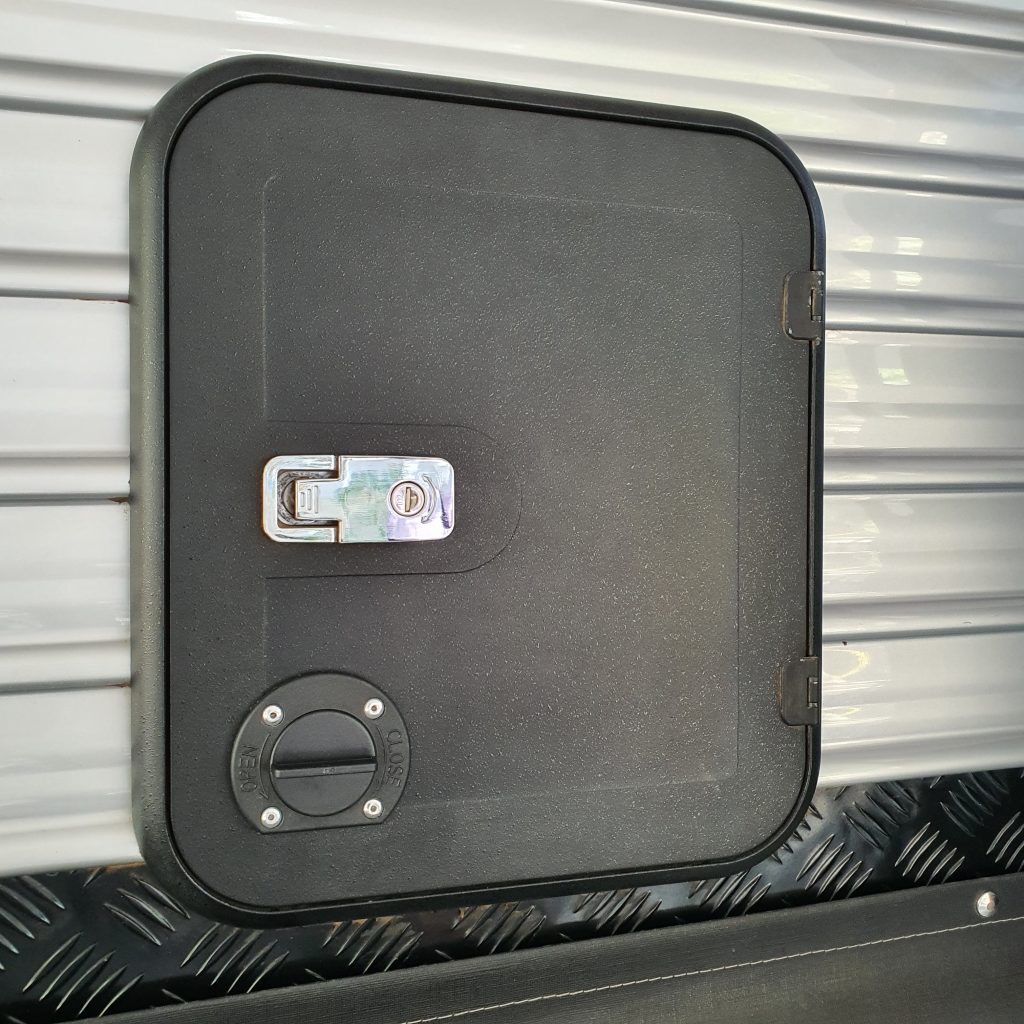
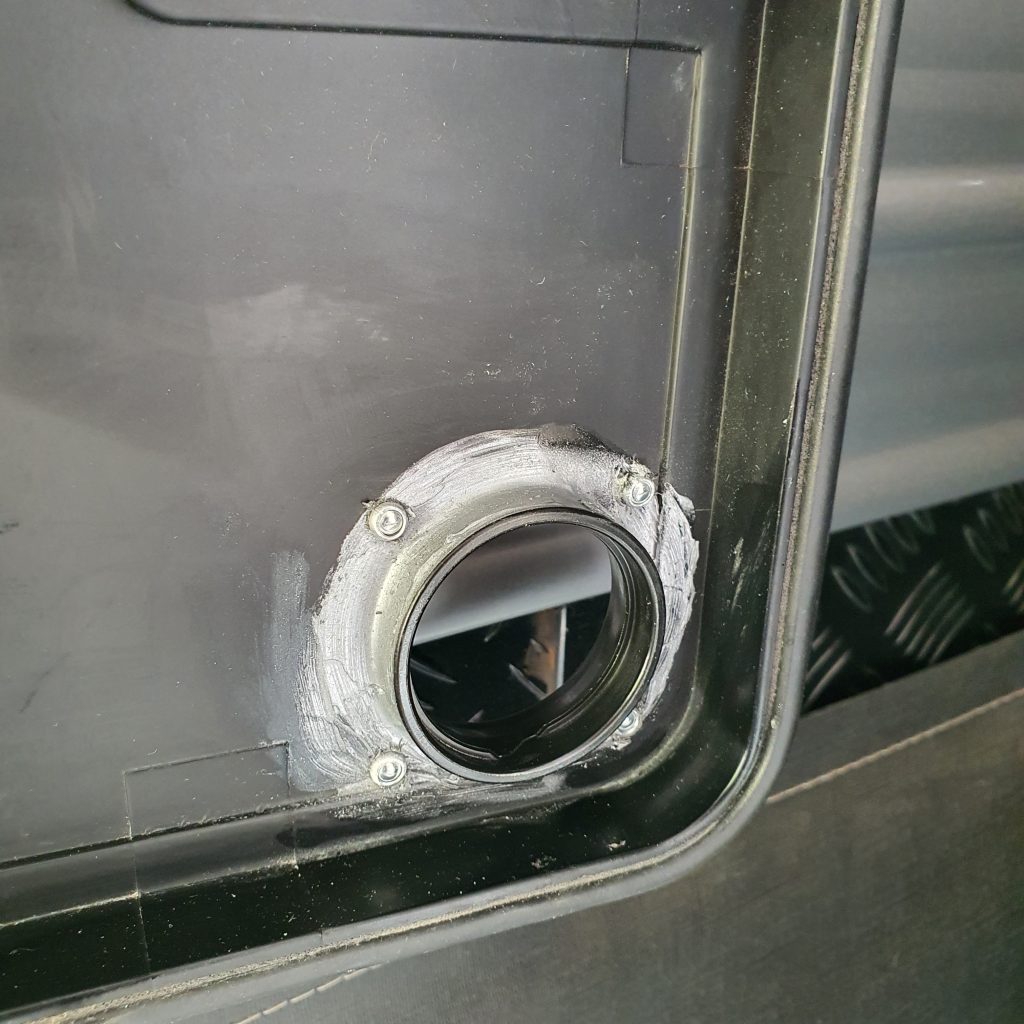
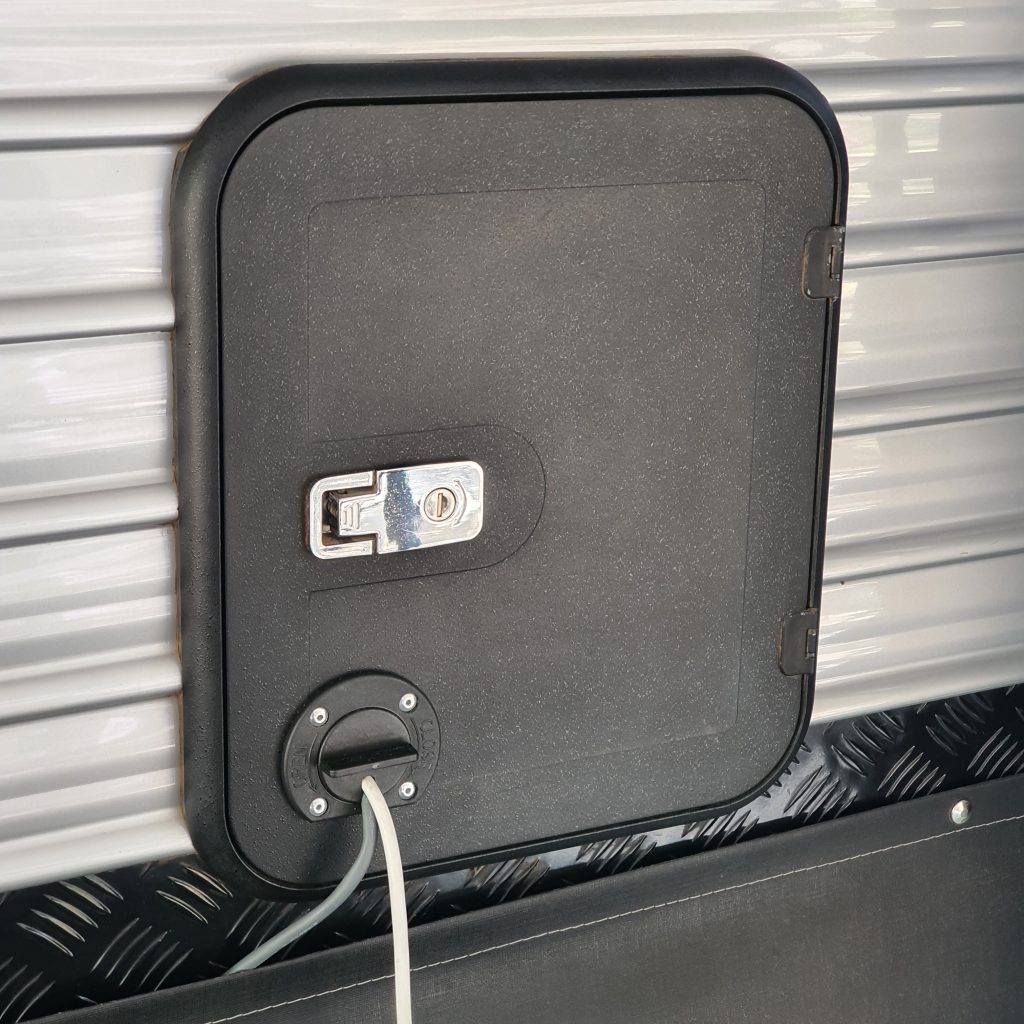
Finally got the boat bung in the mail and fitted. Drilled out the cabinet door (outdoor TV bracket and power cabinet) and riveted the bung hole into place with some silicone for waterproofing (was surprised and a little annoyed to discover the door was actually fibreglass and not nylon like I thought!). Bought a second plug so I could drill out one to hold the cables in place and keep out bugs and water. Full plug used for travelling. The plug is a very large one, 45mm plug (50mm hole drilled) so that I could also fit the 240v power plug for a power board through the hole too (that’s the white cable) as we sit outside working and the power board is used for charging the laptops.
Router is double sided taped to the door (upside down so it’s easy to get to the dish cable) and high enough to allow a 200w inverter to sit at the bottom of the cabinet (though I had to remove it and reattach 20mm lower so I could remove the power and dish plugs! They jammed against the top lip of the door…). There is also a block of foam stuffed in to press against the front face of the router when travelling to stop it peeling off on bumpy roads.
UPDATE: I have since drilled 20mm holes in the sides (top and bottom) of the cabinet and one in the top middle to allow convection airflow from inside the van just to help regulate the temperature in the cabinet as the router runs quite hot (it actually is Water Resistant so has no airflow ventilation in the router – bizarre..). The top left hole has since been enlarged to 40mm to allow the power plug to pass through so it could be plugged in inside and turned on/off easily from inside the van.. This cabinet is boxed in on the inside of the van with power cable entry holes on the sides which allows the airflow.
Update 2: Starlink contact details (Back to Index)
Everyone states you can only contact them via a ticket, this is generally true, however I found this on another site!
The Starlink customer service team may be contacted any time:
- through the app in the Support section – find an item that is closest to your problem then click the thumbs down icon to create a ticket,
- or the customer portal by logging into your account on starlink.com (NOTE: You must be logged in, then the same process as with the app = find a topic closest to your issue and click the thumbs down icon),
- or via email at starlinkresolutions@spacex.com,
- or by calling
1800 954 824. Now 02 4406 8213
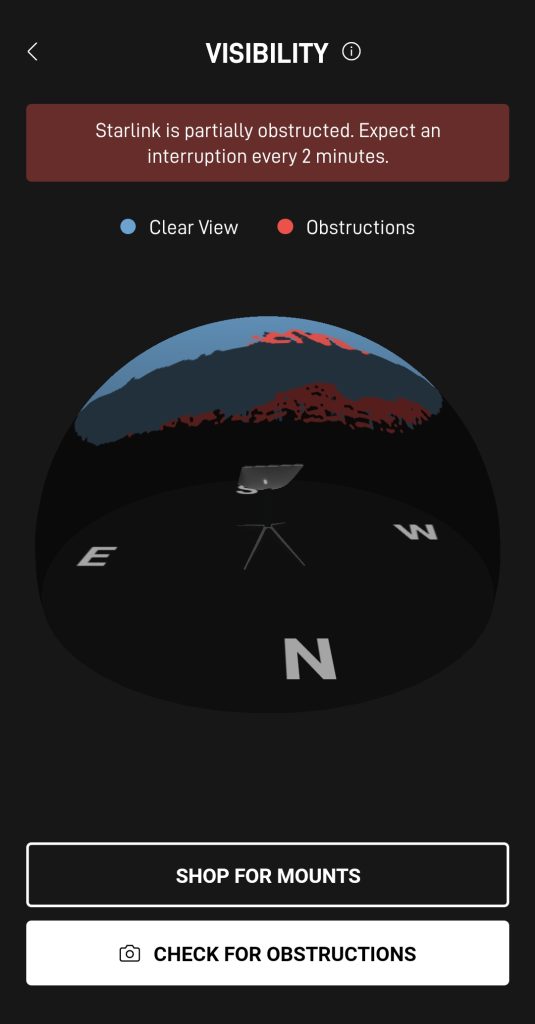
Update 3: Obstructions and weather. (Back to Index)
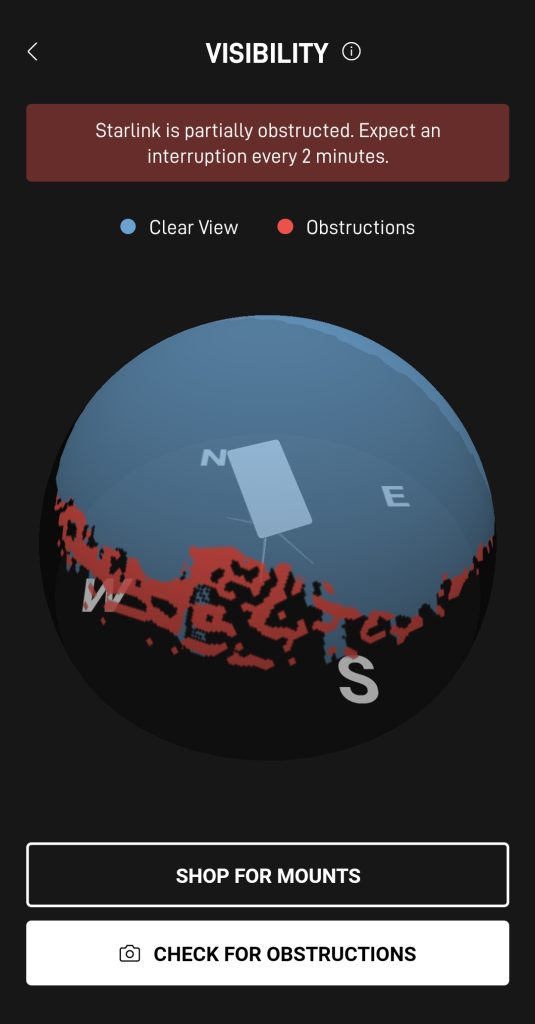
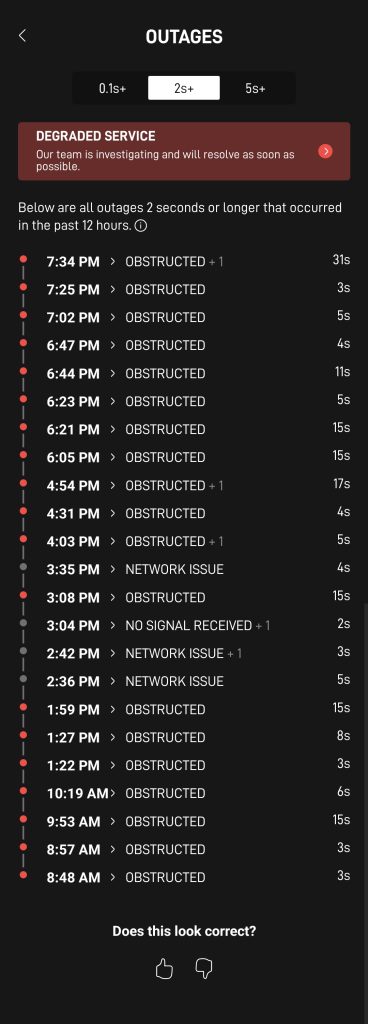
Last site we were at we were in a beautiful caravan site, but surrounded by trees. Without a pole yet the highest I can get is on top of the van. The app reports we will have dropouts every 2 minutes, and the app showed dropouts of up to 30 seconds every 5 to 30 minutes. However, all was not as bad as it would seem. During that stay we had several phone calls over WiFi, several Zoom meetings and Google Meets meetings and not once did we have a drop out!
As the number of satellites in orbit increases (currently at about 2700), these dropouts from obstructions and the ‘No Satellites’ every now and then will decrease.
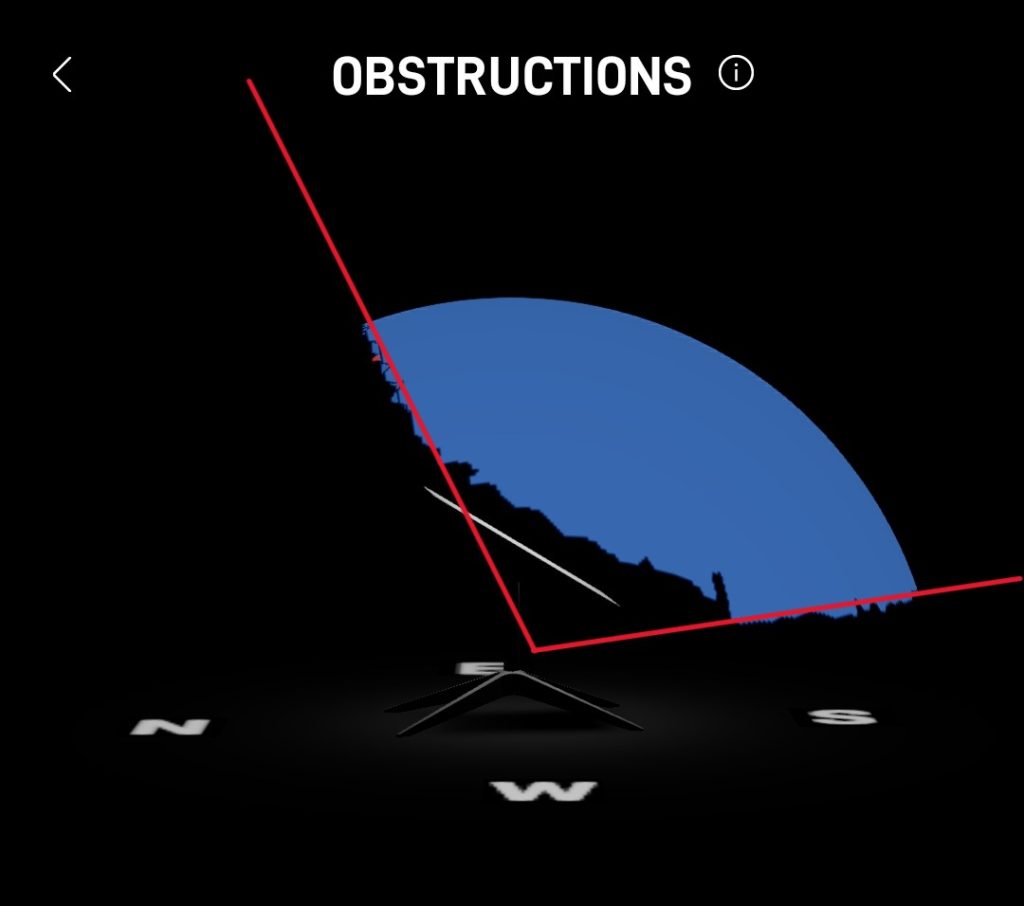
It should also be noted that the Dish requires a ‘cone’ shaped field of view that is 100°, and the dish is angled 60° up from the horizon (30° down from facing straight up) and directly South (in Australia or most likely anywhere else in the Southern Hemisphere). So this means when you look at you dish from the side, it is looking at an angle from the bottom edge only 10° above level toward the horizon, and the top of the dish 10° back from vertical, with the same view required left and right. The last picture below gives you an indication of the angle the dish is looking at. This mean when you sit your dish 2.5m away from a 2.5m high caravan facing directly at the caravan, the lower 20% to 30% of the required field of view will be blocked. It will still work, but you will receive signal dropouts.
Weather:
We have had a pretty good run of weather over the last year (currently had Starlink 14 months at the time of this addition). Light or heavy cloud, light to medium rain, all makes no noticeable difference to the speeds and stability. However, torrential rain might. We had a couple of days of torrential rains around Christmas in Adelaide in the peak of the really heavy rain (around 100mm per hour rates) we lost signal twice for about 40 seconds each time. I was working online and didn’t even notice, but could see the loss of signal and the time it took to reconnect through the app.
Update 4: Inverter and power use. (Back to Index)
As mentioned, I ordered a small 200w (peak 400w) inverter from Giandel store on eBay for under $60, same brand as my main 3000w inverter. It finally arrived (mail to Western Australia is taking forever at the moment Along with some more cable I was needing to install some much needed power sockets. I used 8 gauge cable and wired in a 50amp resetting circuit breaker and a new earth post to start the cabling from. The 50amp breaker is connected to the input of the 200amp circuit breaker for the main inverter – a handy place to pick up a good solid positive connection. The Earth Post is connected back to the battery (which is really hard to get to) and fed with both cores of the twin core 8 gauge cable.
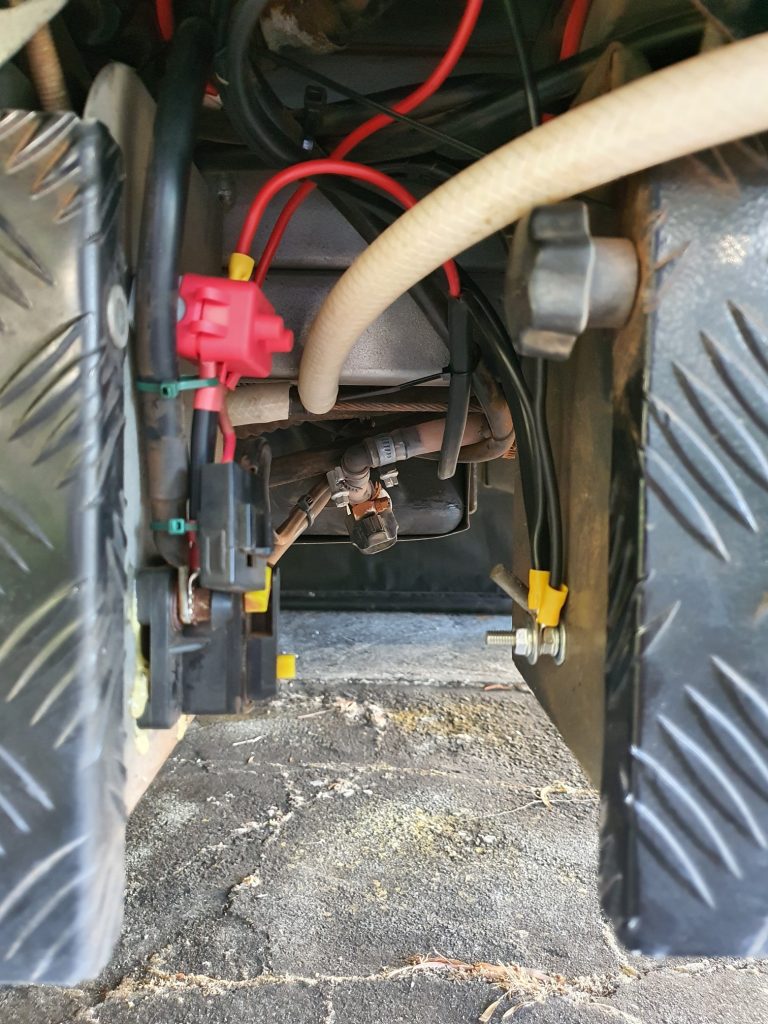
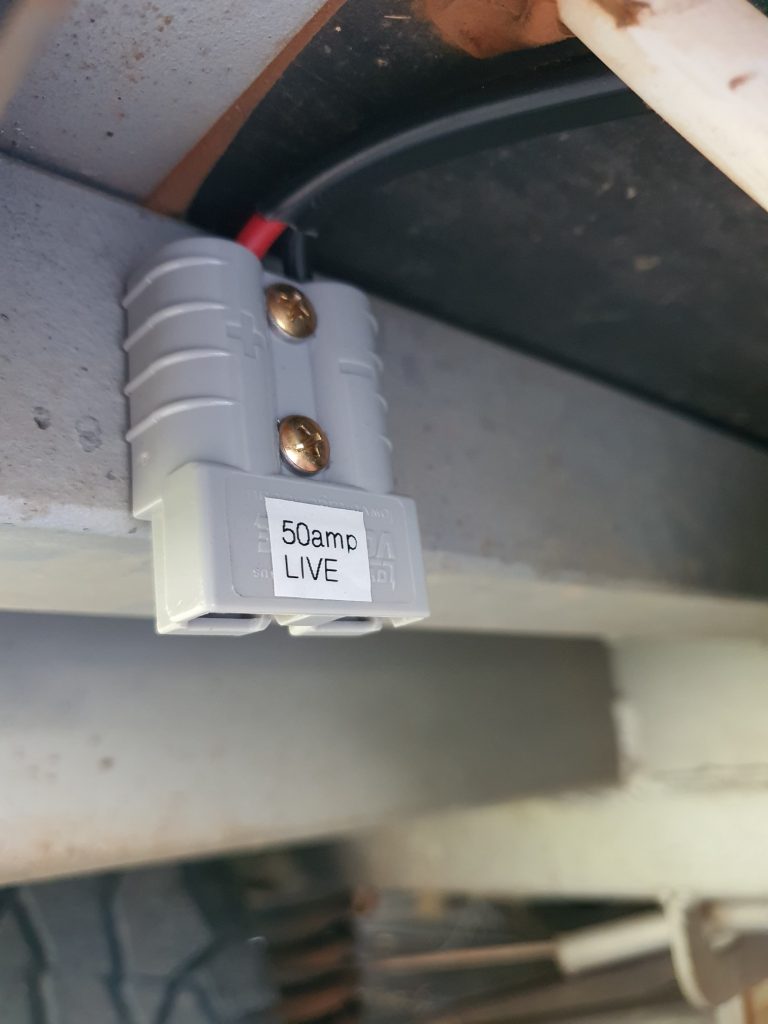
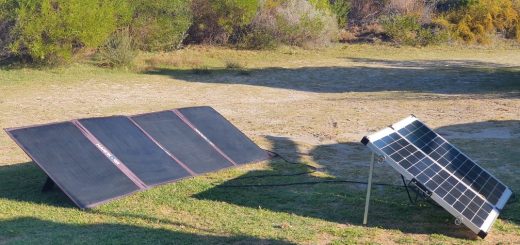
From there, I added a new Anderson connector on each side of the van, the main use will be for the air compressor to check the van tyres and to run the fridge when free camping (the original Anderson on the drivers side I required to go to the solar input so external panels could use the MPPT controller).
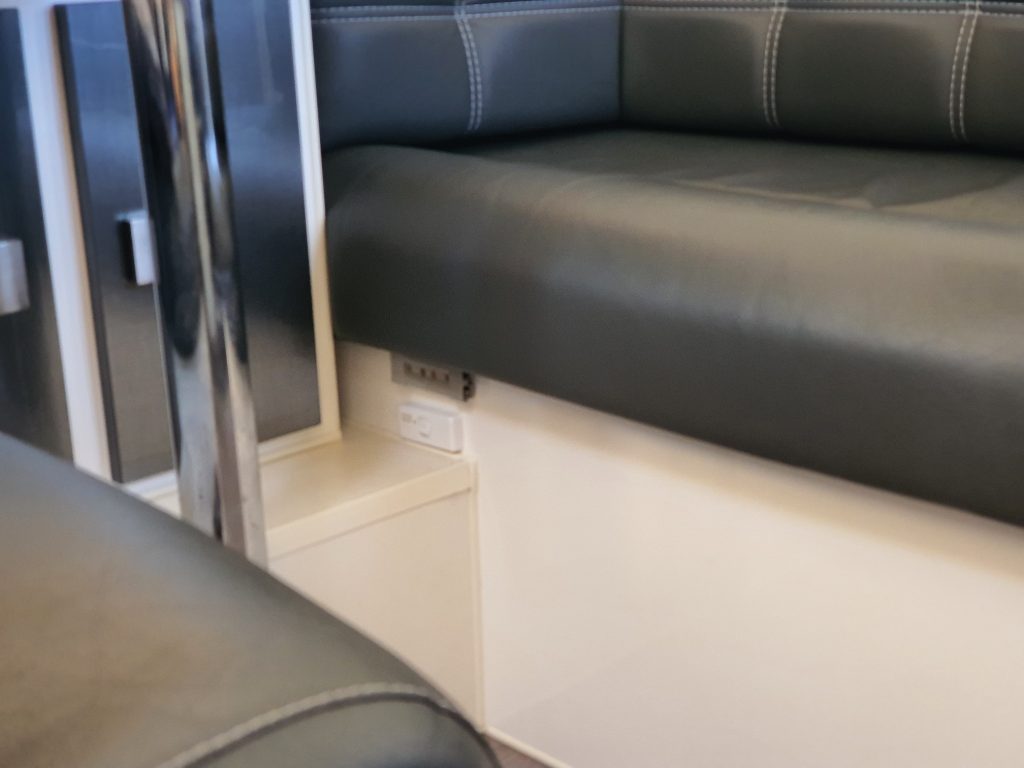
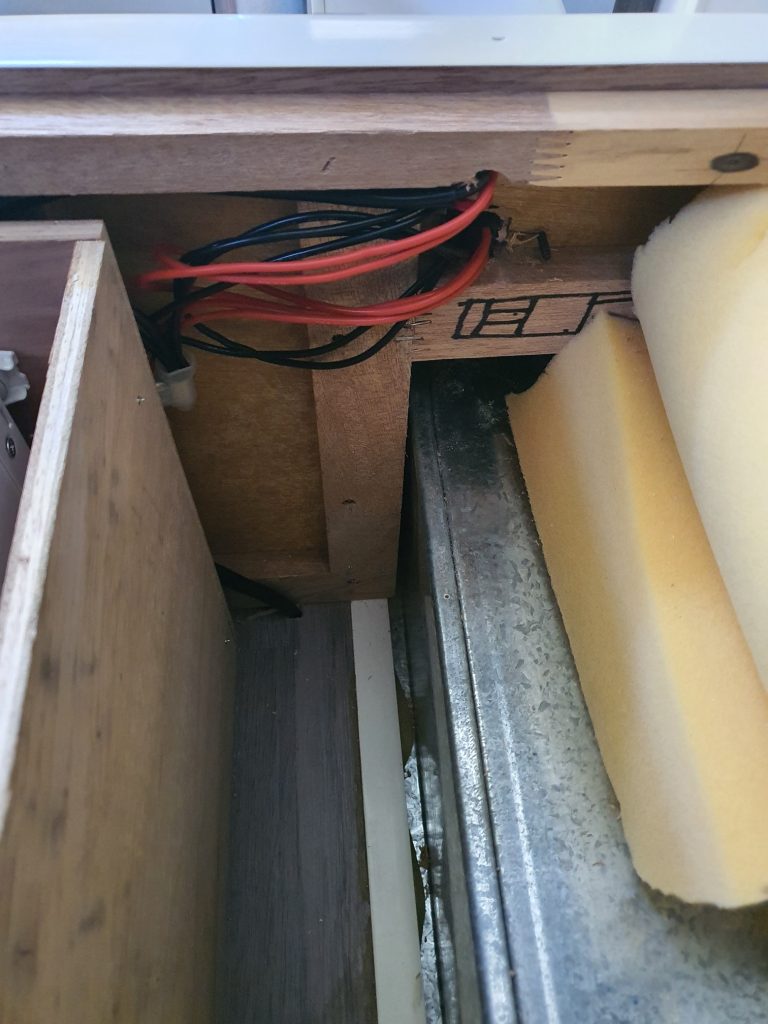
I then extended the cabling inside as well, giving me a full time socket and a switched socket tucked away under the front edge of one of the seats . The full time I will use for the fridge when travelling (or when stationary off grid and not wanting to set up completely) and the switched for the inverter for Starlink.

Testing. I ran up the Starlink system on the inverter with a power monitor connected and it peaked at about 147 watts whilst setting up (no motor movement though as it was already pointing the right direction, so would be closer to 200 initially), then settled to flicking between 35 to 65 watts (total, including the inverter draw). I let it settle for ten minutes, then reset and monitored it for 4 hours and divided the total current consumed by 4 for a 3.6 amps per hour average or 46w. During this time we were idle for about half and streaming Netflix for the other half. The inverter itself is rated at 0.5amps idle, testing showed an average of 0.35 amps / 4.4 watts.
Update 5: Pole mounting (Back to index)
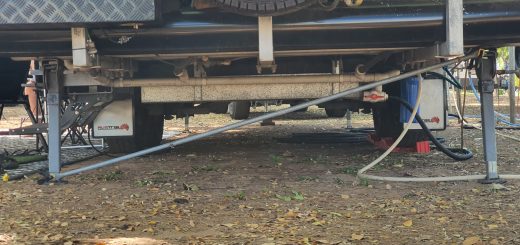
Finally got hold of the pole I had wanted, a very sturdy 3 piece telescopic antenna pole from TelcoAntennas in Brisbane. By sturdy I mean not these 1.2mm wall pool scoop poles, its made of 3 x 1.8m sections, the bottom section is 50mm tube with a 4mm wall, mid section 40x3mm and top 32x3mm. TelcoAntennas are not comfortable with using it for the Starlink dish however due to the potential wind loading with a single mount at the bottom. They are making a new version with the lower and middle sections only that will be officially wind rated for the Starlink dish. However, mine will not be extended to full height unless absolutely necessary, its not just mounted from the very bottom only (using their tow-bar mount) and if used at higher settings+ it will be supported higher up for stability.
The pole itself uses poly pipe joiners, screwed on to the top of a section and compression fitting on the smaller section that slides inside it, allowing them to slide into each other and be quickly extended and locked at any length (they do have a read line etched around the sliding sections to indicate maximum extension). For the top to the dish attachment I grabbed the same make poly pipe joiner from Bunnings except instead of screw on its 32mm compression fitting both ends.
So this is what we start with from Bunnings, the Philmac 32mm Poly Pipe joiner at under $15:
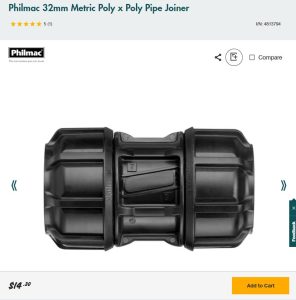
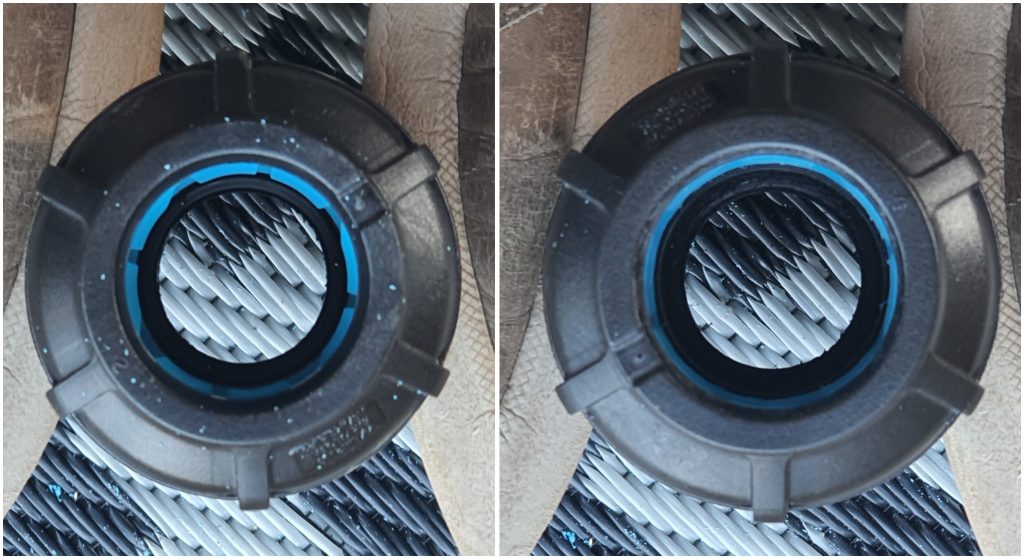
This joiner is designed for a 32mm poly pipe, the end of the Starlink pole is 34mm. A quick attack with a file and a knife and its a perfect snug fit over the Starlink pole (it was a forced fit initially) and the bottom end is already perfect firm fit over the 32mm top telescopic pole section.
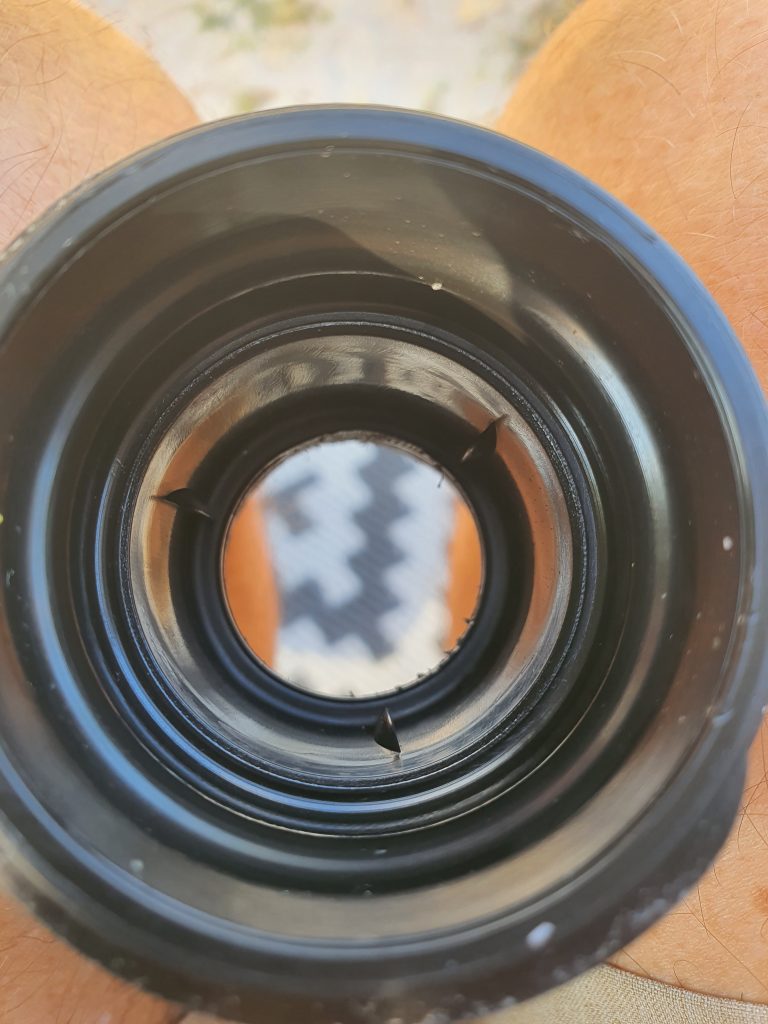
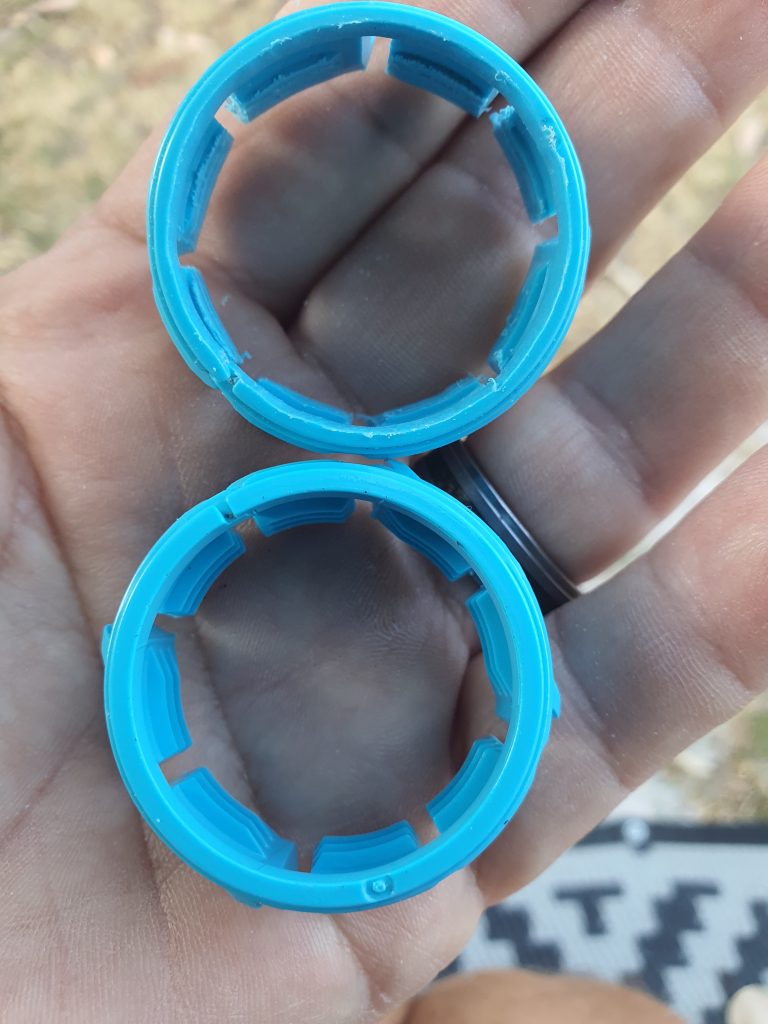
You can see here this first picture is looking inside the original with the 3 lugs that bite into the poly pipe normally. I sliced them off then sanded down flush (only had really rough sandpaper, a Dremel would have been much easier). Third and fourth pictures are the compression fitting, that was made so it would open larger in the fitting and also filed internally so it would slide easier over the 34mm Starlink. I also filed the main screw on nut so that it was a snug fit over the Starlink pole, it was really tight to start and would not have been possible to position it over the pole properly.

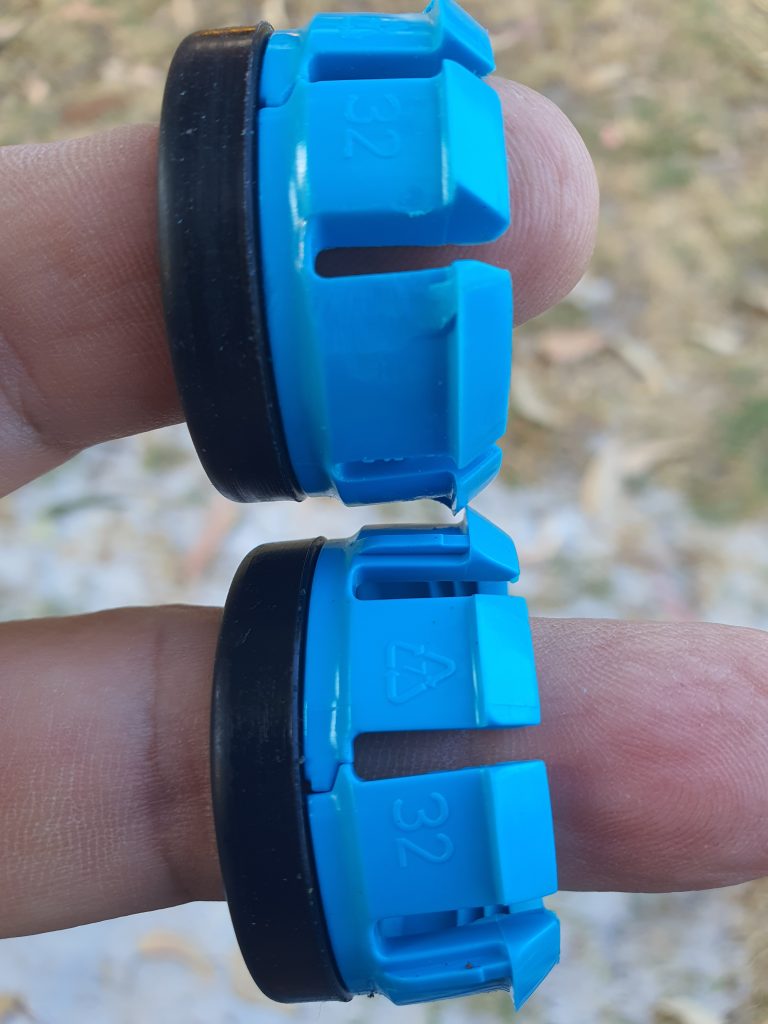
Net result looking into the fitting once reassembled, original on the left, modified on the right. Its a bit hard to tell but the black nut section has been filed out ever so slightly until its a nice snug fit rather than a forced super tight fit.
The pole itself as mentioned was from TelcoAntennas and is their Heavy Duty 5.7m telescopic, weighing in at about 7 kg. I have this currently mounted in a spare Jockey Wheel clamp on the draw bar, but I will be grabbing some 1m tie down straps to lash it to the rear bar and rear handles, or the top awning bracket etc. to make it more versatile.

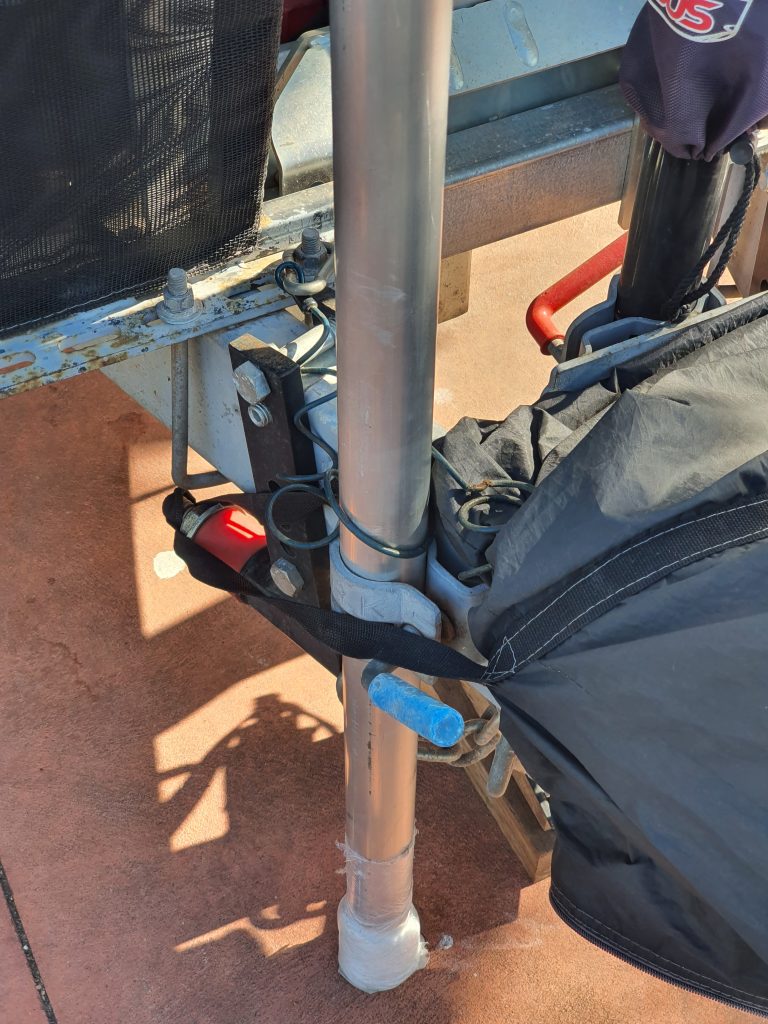
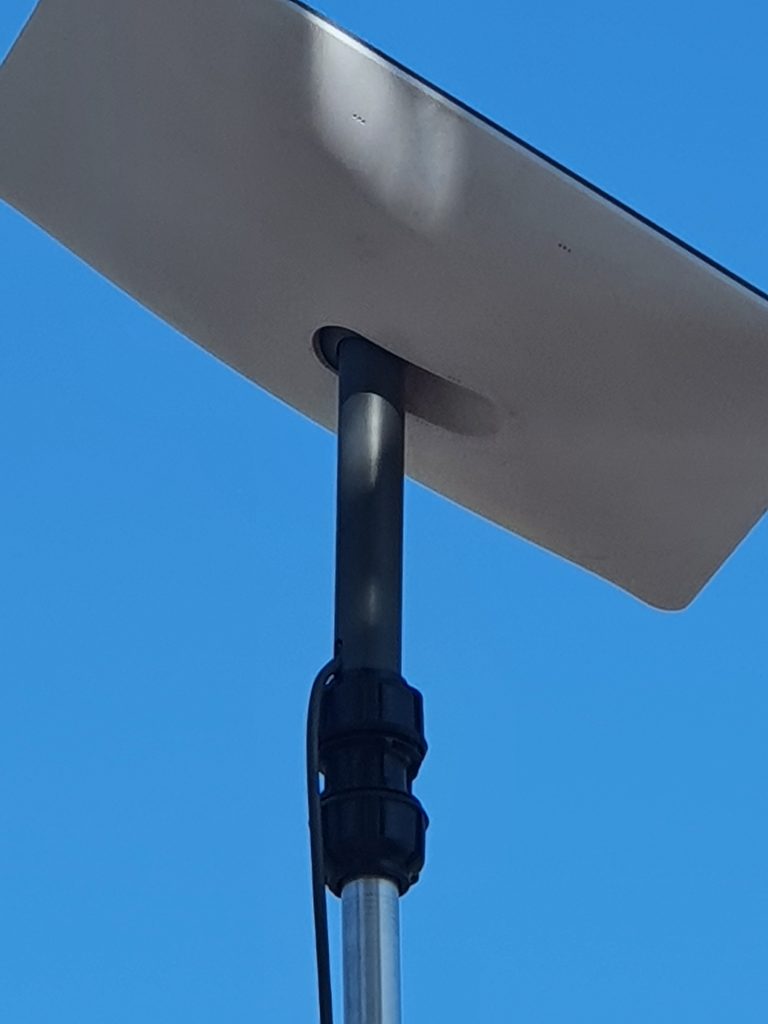
The first pic is the pole in place, second and top sections extended about half way each, so about 3.5m roughly and 2m short of full extension. The last pic is the joiner installed, locked quite tight onto the pole and the Starlink. As you can see, the Starlink is inserted as far as it can go into the joiner for as good a grip as any available mounts.
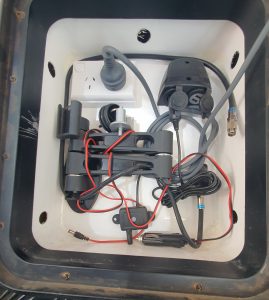
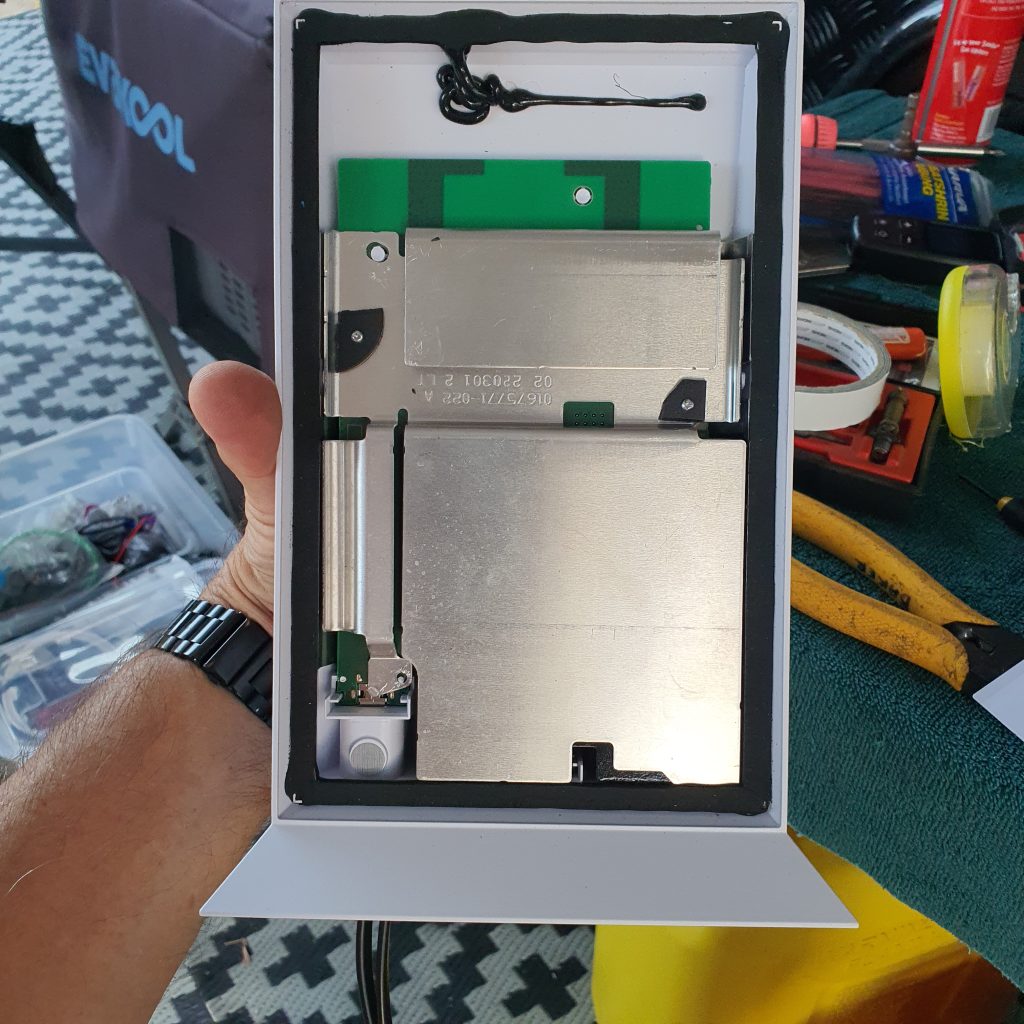
Update 6: 12 v conversion. (Return to index)
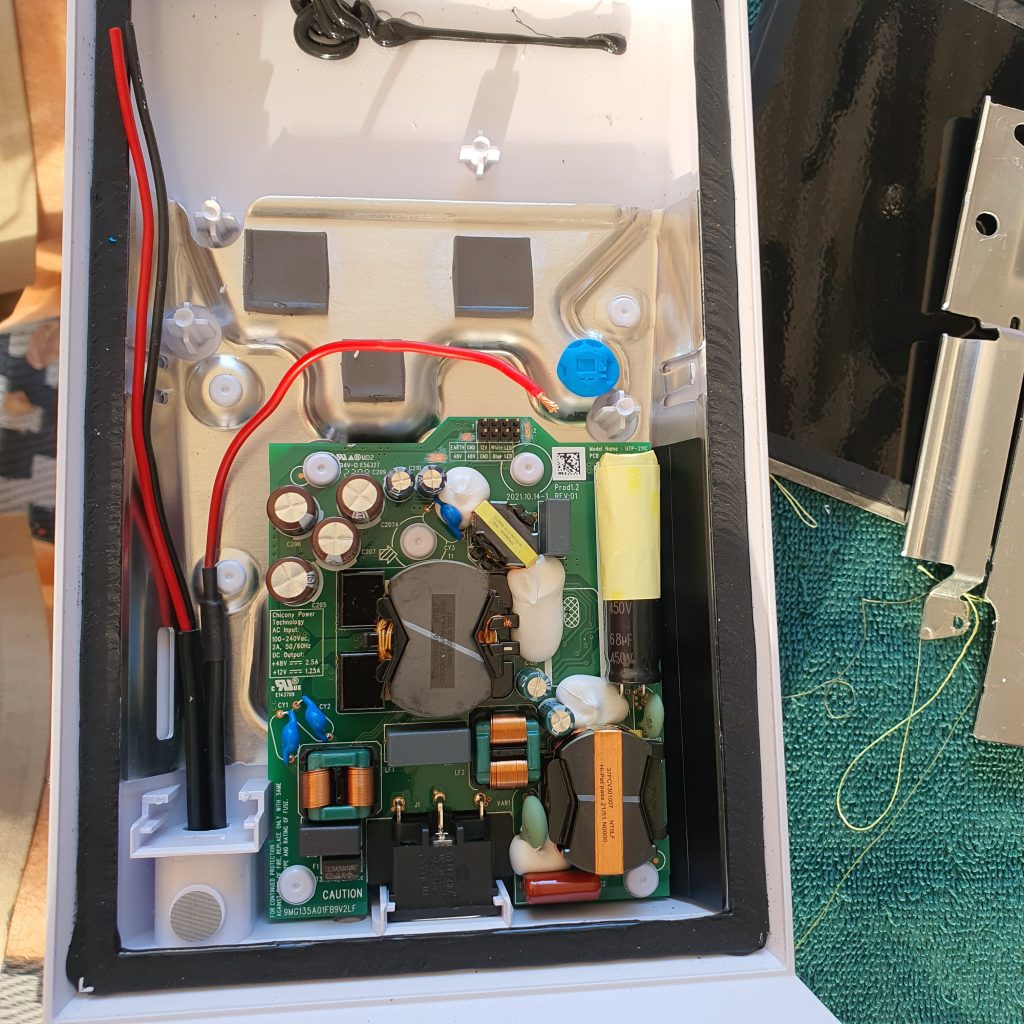
OK, I got the bug and after lot of research decided on combining a few different 12v modifications I have seen. The goal was to keep the Mains power supply in place so either can be used and also keep parts and costs to a minimum. Since the the Router board will run between 9v and 16v, a 12v buck/boost regulator is not required as it happily runs directly off the 12v caravan batteries (max 14.2 for our Lithium while charging, some might go to 14.6, but if it gets to 16v you have other concerns..).
NOTE: Modifications like this will void your warranty and should not be attempted if you are in any way unsure of what you are doing or not confident in working with electronics. ALWAYS remove all power connections from any device before attempting to open it.
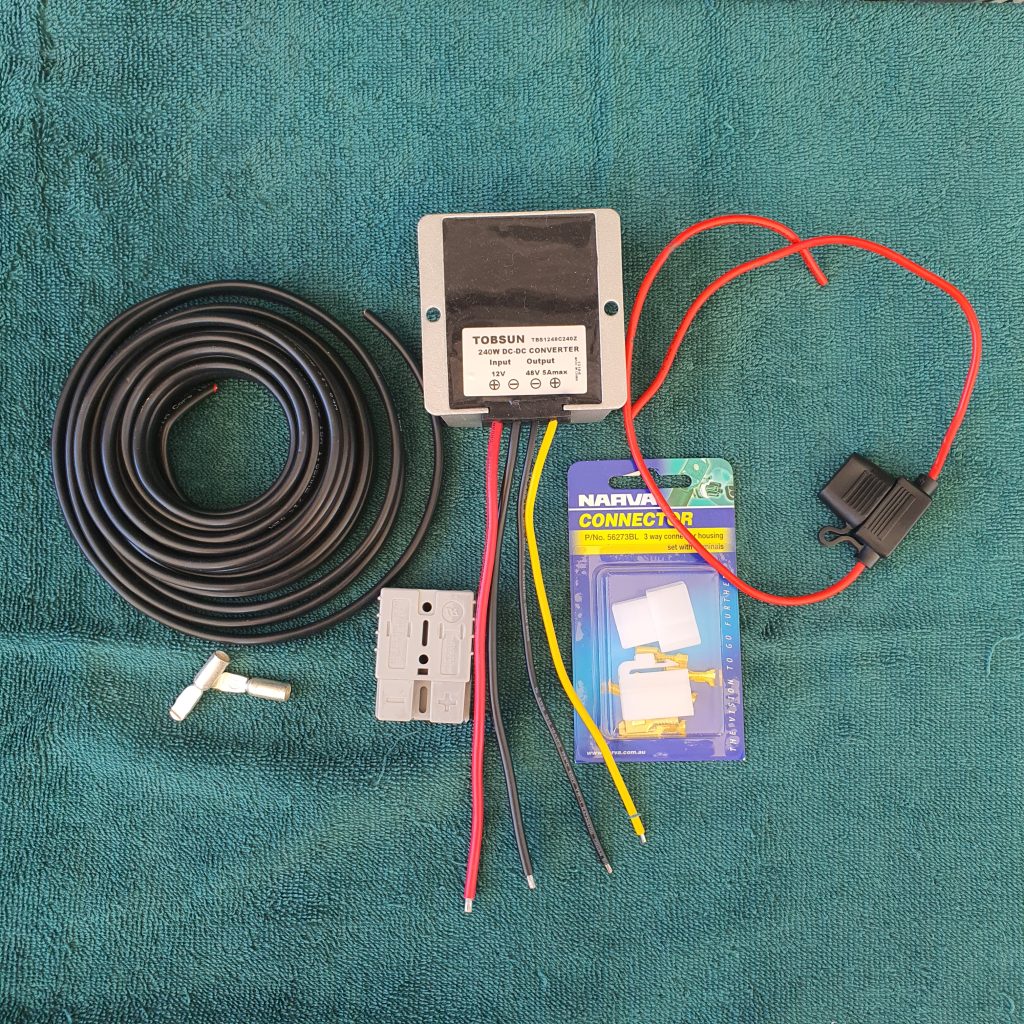
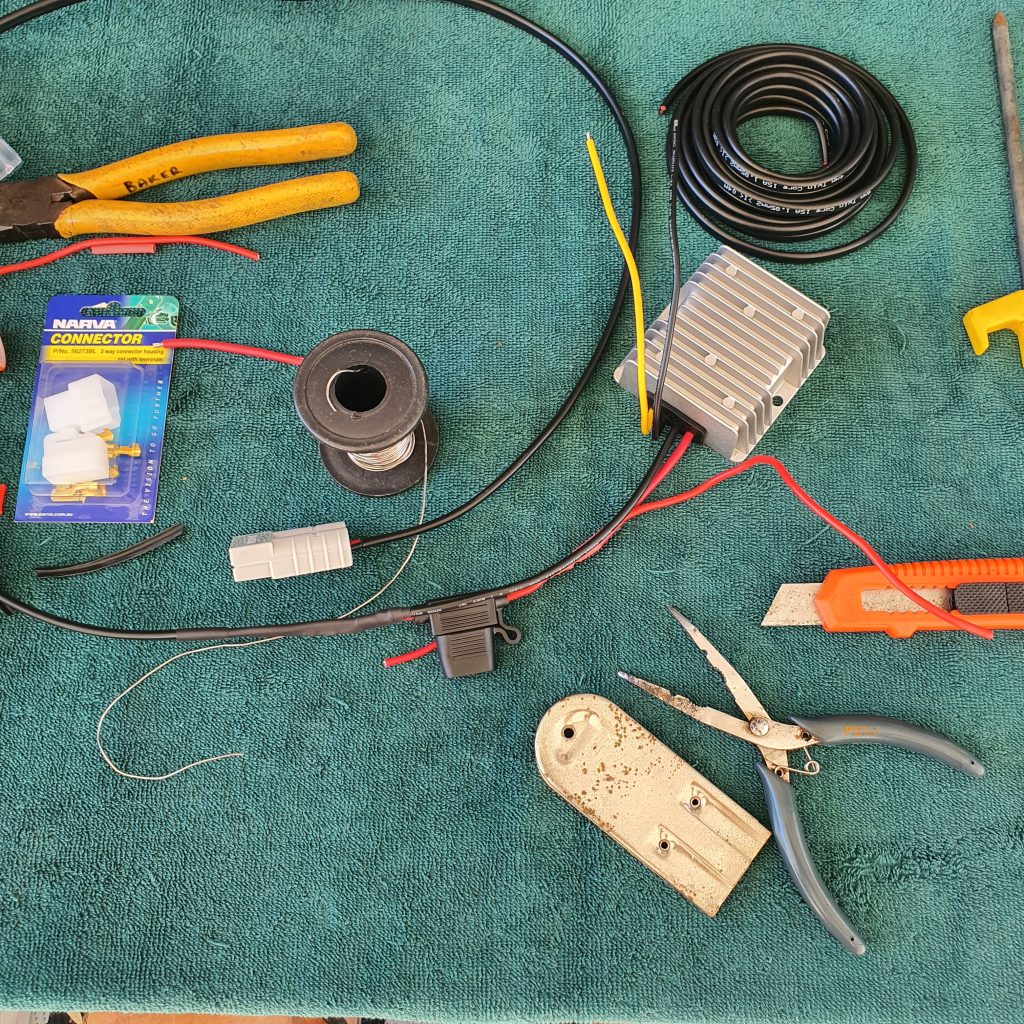
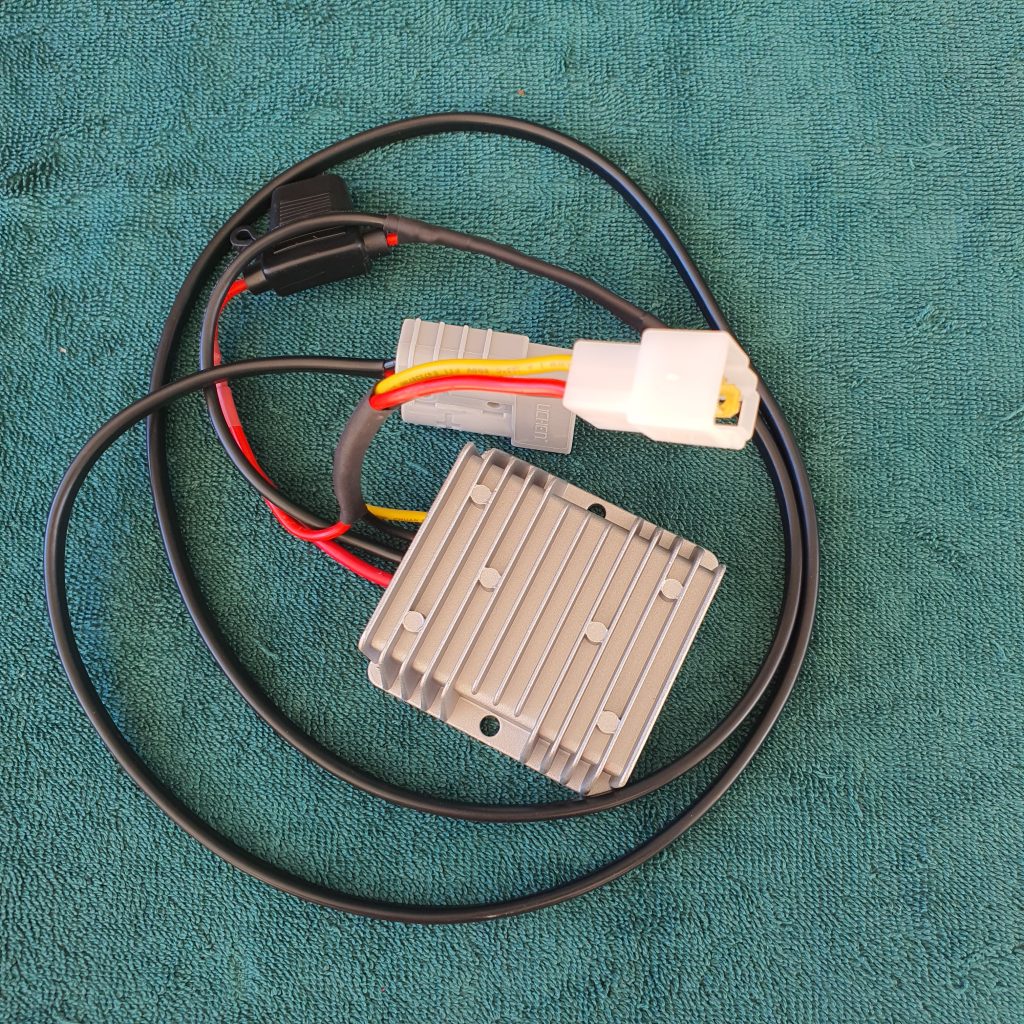
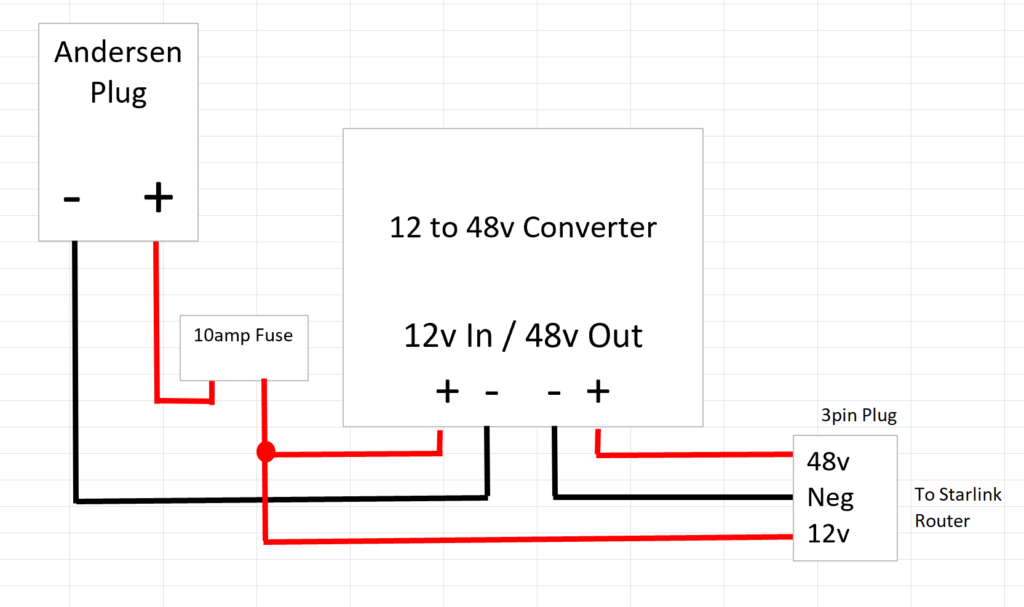
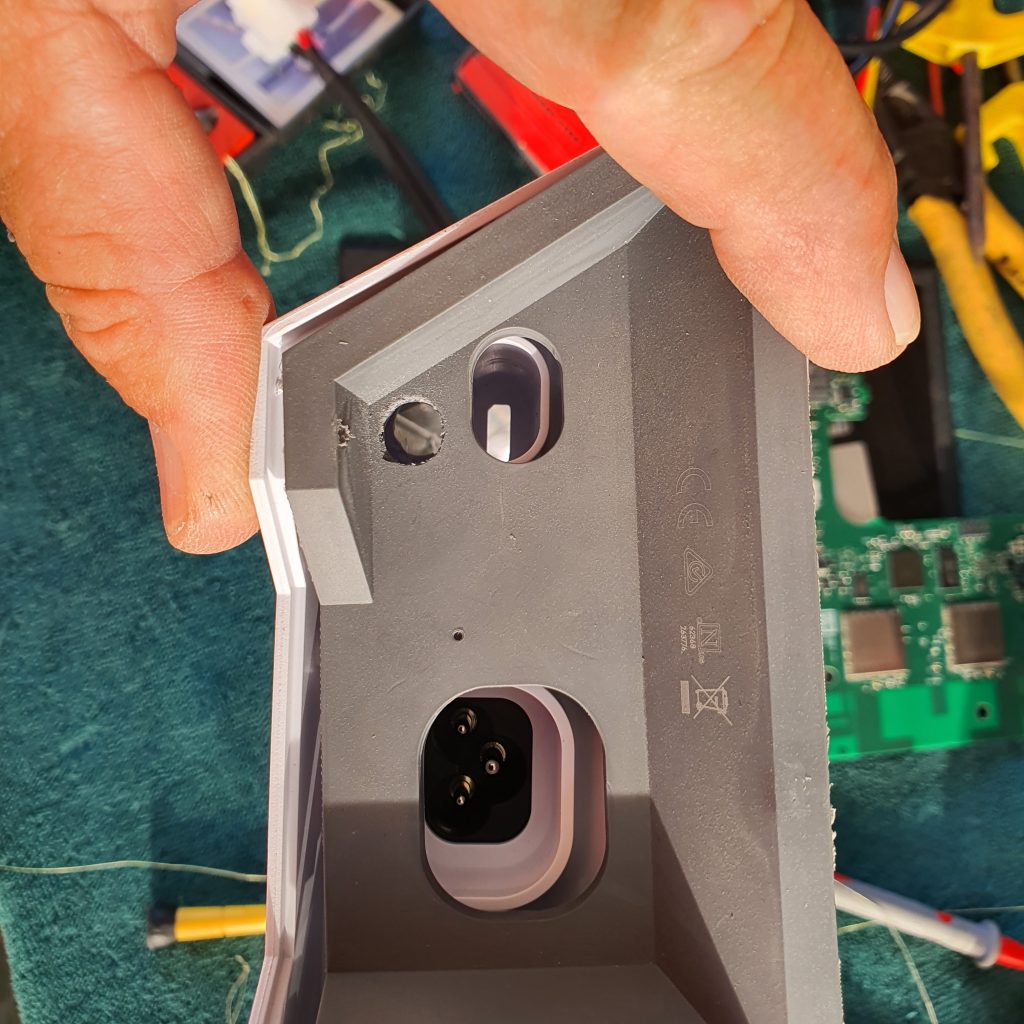
Parts: 12 to 48v power adaptor (I used this 5amp one from eBay – working perfectly), 3 pin automotive plug from the local auto accessories (Negative, 12v and 48v), some cables, a 10 amp fuse and I used an Anderson plug to connect to the van power. I used the 3 pin Automotive plug so the power supply can be removed when not needed. I also used the female end of the plug (the protected end) on the router end as when the mains supply is used the cable and socket will be live 12 and 48v so I don’t want it to be able to short out. This is reversed to a normal setup where the power supply would normally have the protected end. All up about $60 in parts.
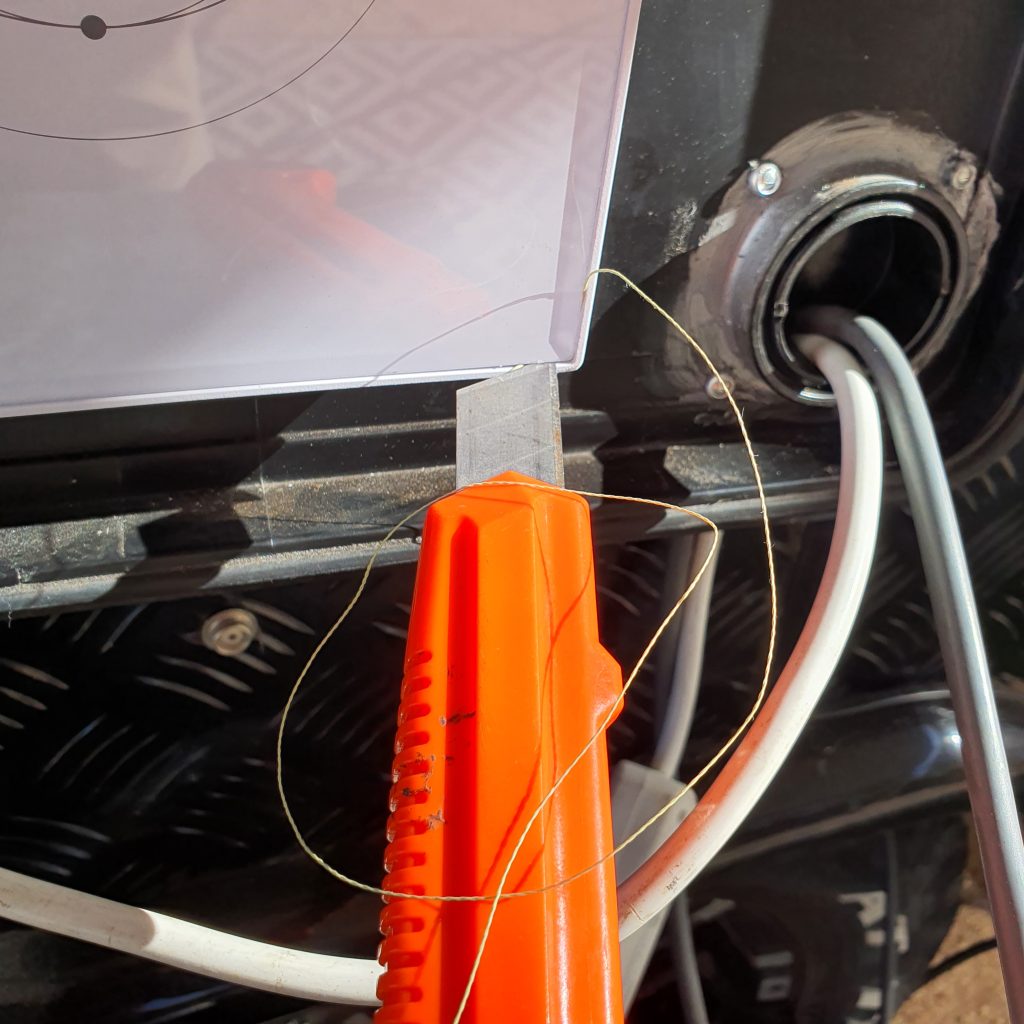
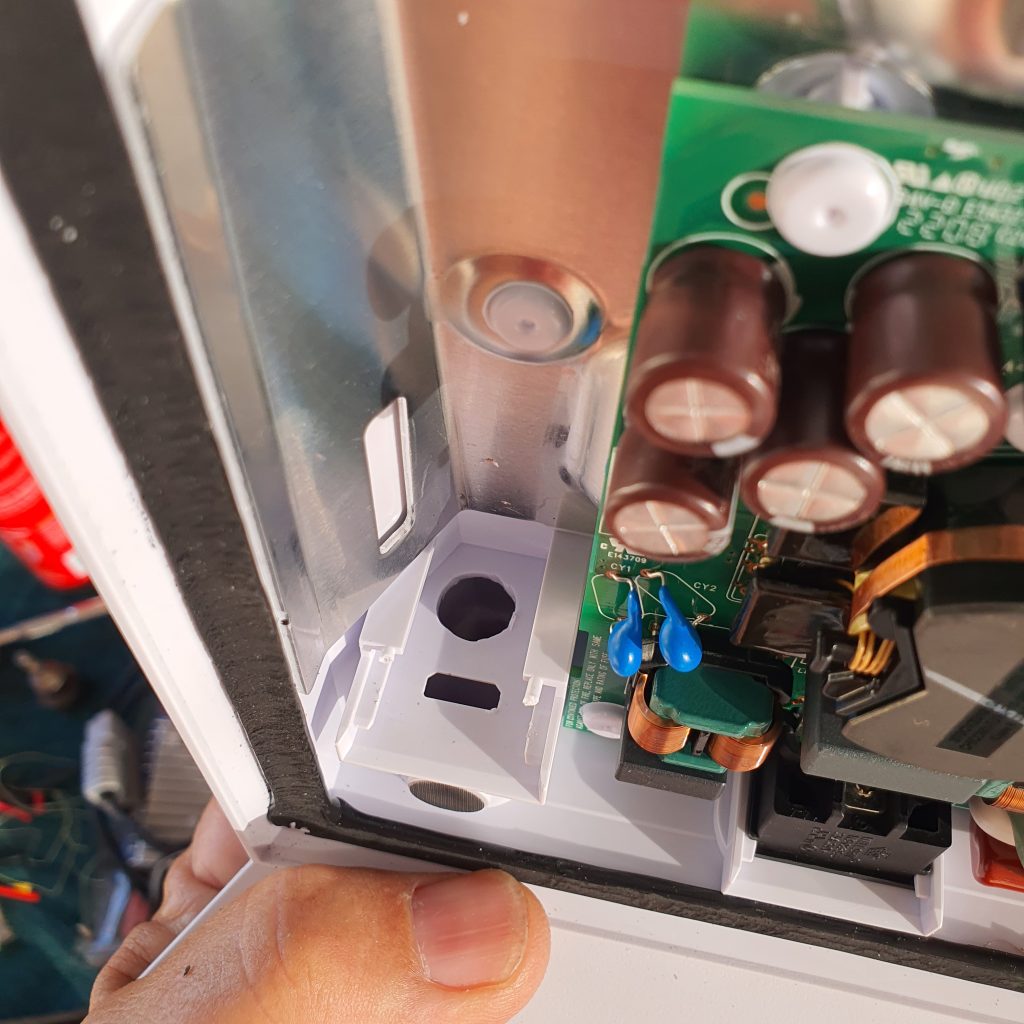
For the router modification, I first opened the case gently without damaging the plastic by using a piece of braided fishing line as a flexible saw to cut through the silicone holding the glass in. Simply inset either side of a corner using a small screwdriver (first off I used the back of a knife blade) then pull back and forth slightly angled to the glass so not to rub on the plastic. Takes a while and a few bits of braid but got there in the end and no damage at all to the plastic casing. Make sure to either wear gloves or wrap the ends of the braid around something as it will slice through your fingers as easily as the silicone!
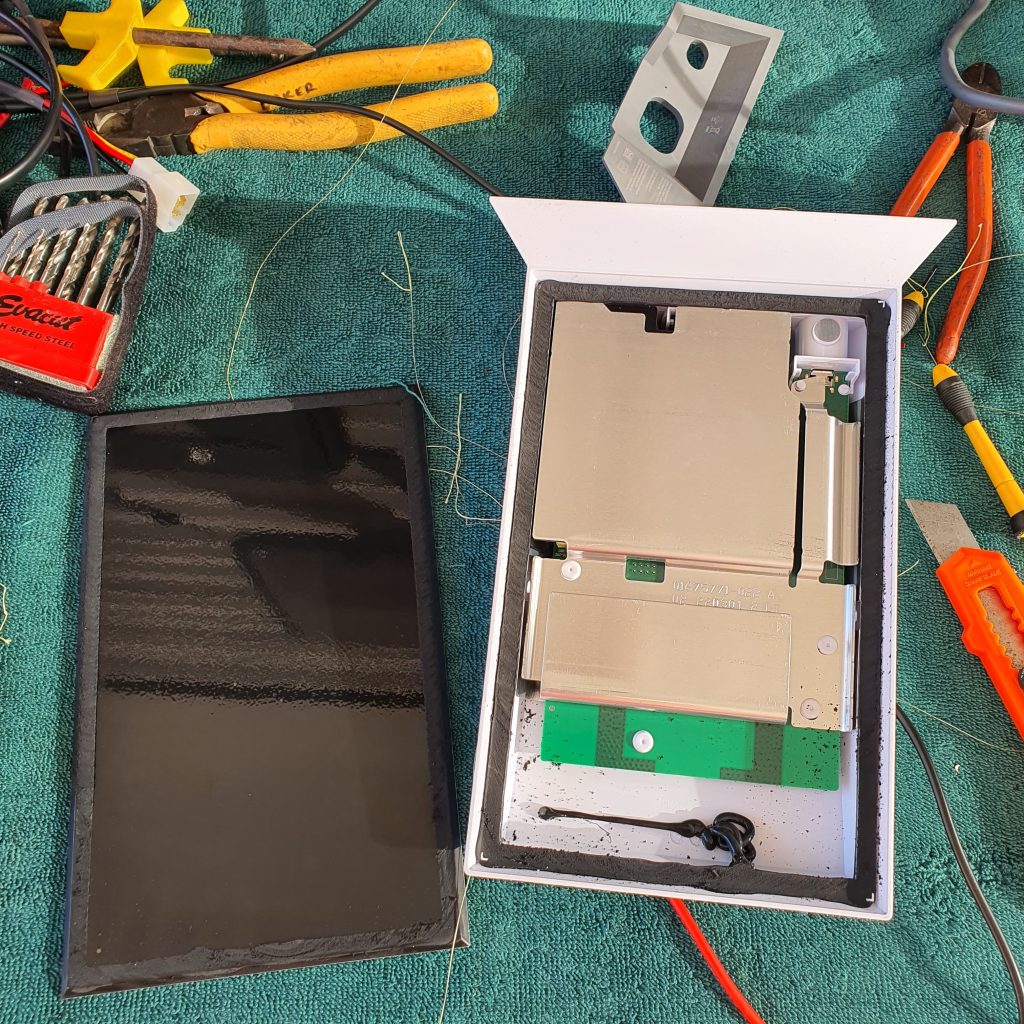
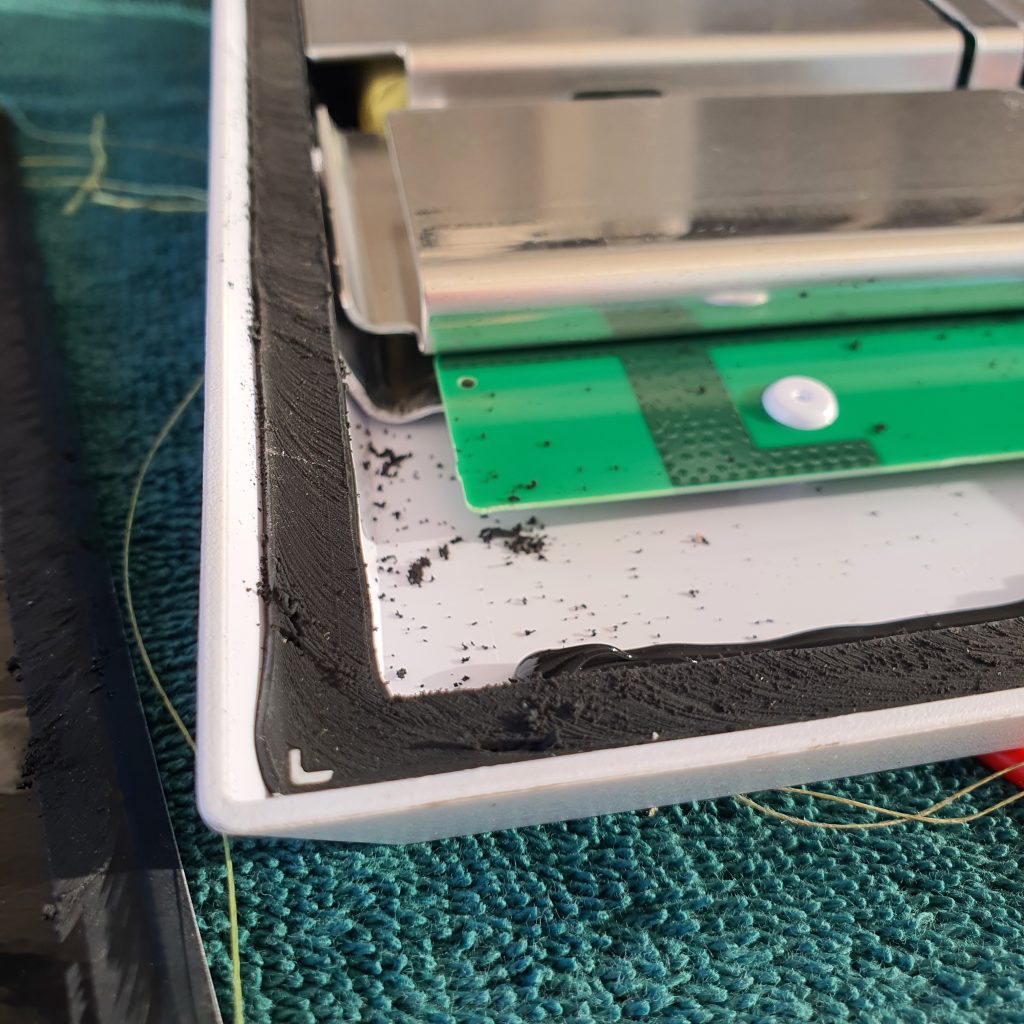
Next I used a large drill bit on the melted over plastic posts holding the heat sink in place to take the melted top off (biggest I had was 6mm, 10mm at least would be better), don’t forget the two smaller melted plastic posts down at the Dishy socket. The router board is only held in place by the heat sink and the connecting plug, so once the heat sink is removed pull straight out on the router board to release the plug. The bottom grey plastic trim cover was also removed – its just clipped in place and was easily removed from the front edge by fingers alone. I then drilled an 8mm hole behind the dish connector to run the cables under the router board and a matching hole in the grey cover.
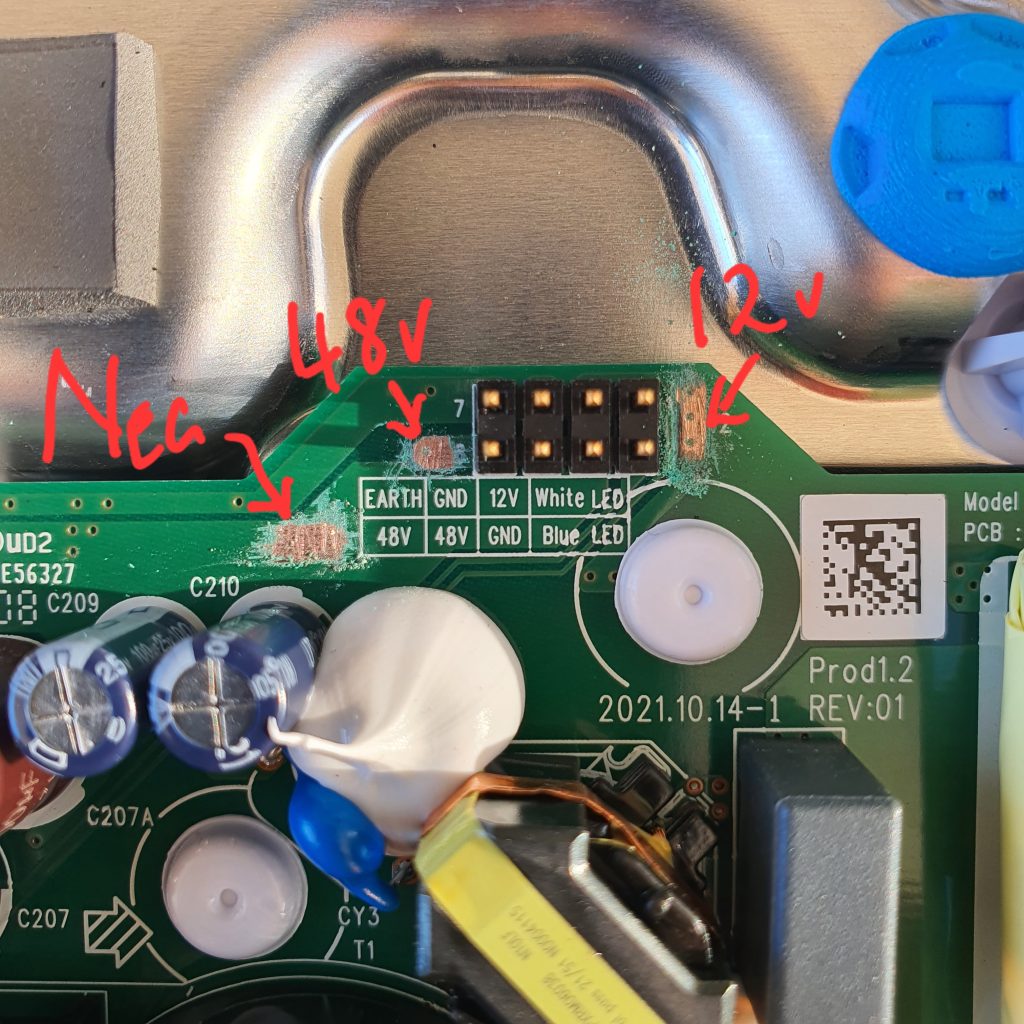
Connection points identified for 12v, 48v and ground, circuit board green protection removed, copper tinned, wires soldered in place (then triple checked they are the correct wires in the correct place), router board reassembled into place, Heat sink refitted. Two of the previously melted over posts were drilled out with a 2mm drill and a small screw installed with a washer to hold the heat sink and router board firmly in place (the ‘washer’ is a small piece of scrap 2mm thick plastic with a 3mm hole drilled in it!)
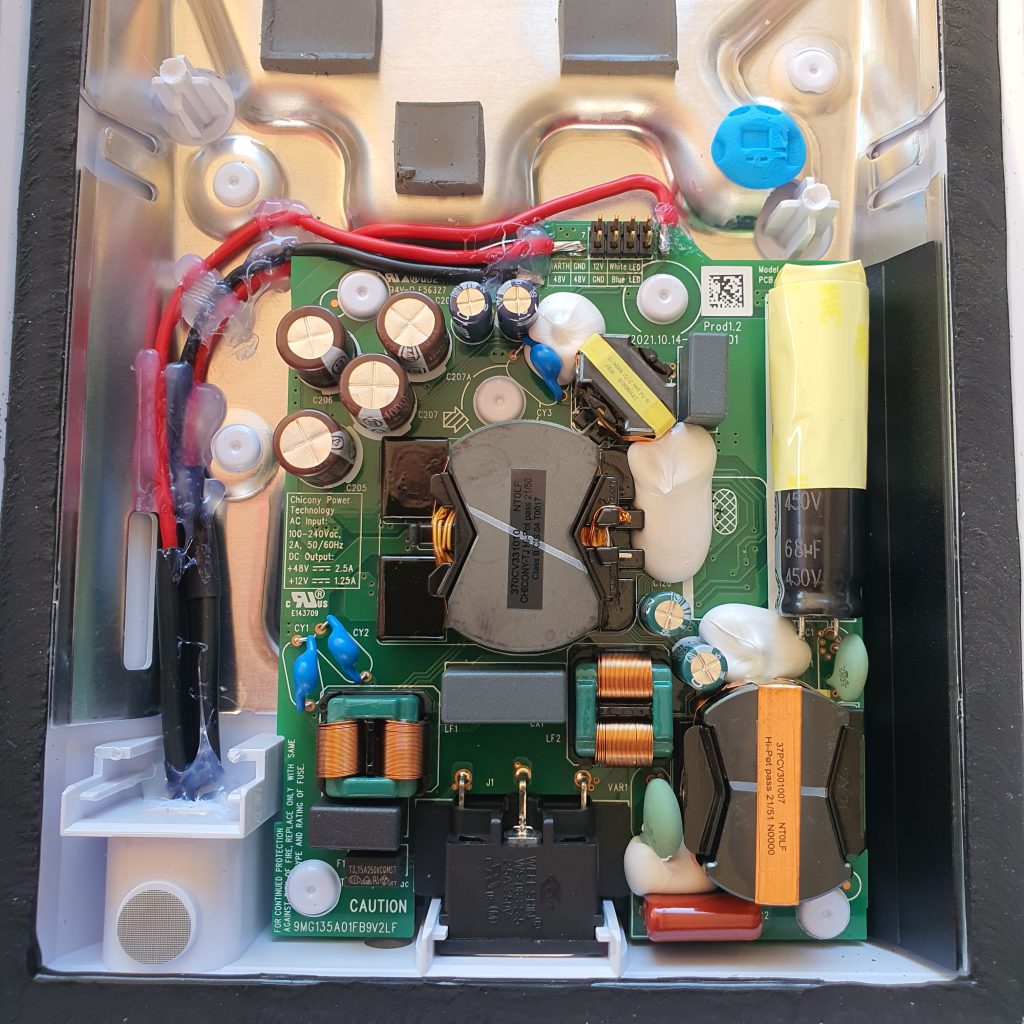
Glass was put back in place and held in by just clear tape for now, I haven’t decided to glue it on yet, I may still drill some ventilation holes in the case. However it does run a lot cooler than previously.
Testing showed a huge 0.5 amp less power use, plus another 0.2 from not using the small inverter – so a total saving of only around 0.7 amps or 9 watts. Not a huge saving, but silent running (no cooling fans of the inverter) and a lot less heat. It’s also connected to an Anderson plug inside the van that has a dedicated switch so I can easily shut it off over night when off grid.
Updating your Address: (back to top)
When relocating your Starlink fixed address service (Residential or now called Standard) you will need to update your user address in your account. This will keep giving you the priority access to data over the RV/Roam (now called Mobile-Regional) users. We actually do this even though we are in a caravan, simply updating every couple of weeks as we move. The only caveat, there may not be spare bandwidth at the location you are moving to, meaning the address change won’t work. If this is the case you will need to change the account to RV/Roam (now Mobile-Regional) temporarily until space frees up. We did check with Starlink before doing this and they advised there was no limit to how often you change the address.
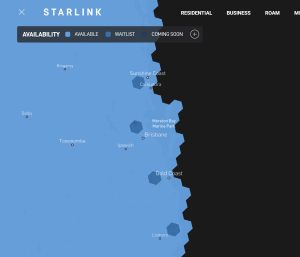
If you jump onto the Starlink website Map page, you can zoom in a little and see currently congested areas (as I was typing this there are 4 in the SE QLD and NE NSW area, 2 in Sydney, 1 in Melbourne and 1 in Alice Springs – these change regularly as more satellites are launched). Congested areas are shown as the slightly darker blue hexagon, approximately 22km across and look like this on the map:
To change the address, I have tried and given up using the Starlink methods of either entering the street address or trying to pinpoint on the map (which doesn’t have satellite view), instead I use the Google Plus address codes for the exact location I am at.
I recorded a short video of how we update ours, much easier than trying to type out and take photos! Note this video is done with mobile data, below I have a second one without mobile data (ie a no service area)
Update on using Residential for travel and changing address when first setting up.
So today we travelled 550km and I purposely did not reset the address to the new location to see what would happen. No mobile reception at this spot.
So we set up, waited for signal, the app said not at registered address and would not give me Internet, as expected. I clicked the warning notice and that took me to the account page where it shows the address. I clicked that and that took me to the web page of the account but of course I didn’t have the address of this location (middle of nowhere) and their map does not have a locate me option. So I opened Google maps, no data… Then I noticed an odd icon in the top bar and clicked on my Wi-Fi and it was asking me to log into my Wi-Fi, bizarre. So I did and it gave me internet! Checked the wife’s iPhone (doesn’t have the Starlink app) and it was asking her to log in to the WiFi, but when I clicked yes on hers it opened the Starlink accounts login web page. I didn’t continue on her phone.
Anyway, since it was now giving me Google maps for some reason I was able to get the plus code for this location and updated the address. Still no internet on either phone. About 15 minutes later the warning went away and we both had internet. Will check again tomorrow as we are moving again.
Its now tomorrow: Yes it did work the same way. Once logged in to the Wi-Fi it gave me access to Google Maps so I could pinpoint my location and grab the Google Plus code. Here’s a slightly longer screen recording of this process:
Update: it’s now September 2023 and we have been using this process since March covering around 15,000km over the northern half of WA and it has worked perfectly. Pretty close to 20min after the address change is entered it’s up and running.
Please leave us a comment down the bottom, or if you would prefer a private message please use the contact us page
Don’t forget, use this link to order for a FREE MONTHS access fees!
Thanks for putting this up. My wife and I are currently in the early phases of doing planning for remote work, (I’m in IT), COVID has changed the need to be in an office, and Starlink changes the game for me with internet connectivity. I’m about to pull the trigger on the starlink purchase with the aim to trial it on a couple of short stay runs in some different places, (from Pemberton to Paynes Find), to get a feel as to wether this will work for my line work. The obstruction and extension pole updates are incredibly helpful for me. So thanks again.
You’re welcome and thanks for the kind words! I must confess though did have to Google those two locations.. In those areas you find the best speeds, its only around Capital cities the congestion comes in. That said we are in Perth at the moment (northern side) and speeds whilst slowed, are still good – just tested at 8.30am on a Tuesday morning and 157mbps down and 11mbps up, working perfectly for Zoom sessions with my students. The only issue some are having is with the CGNAT that starlink uses and the single POP in Sydney creating issues with some VPN setups. The only issue we have is trying to watch live TV on 7 Plus as it thinks we are in Sydney and has no option to change manually to WA! Other streaming stations either use our GPS location or give us a manual option to set the time zone, 7 is just slack 🙂 Good luck with the travel and hope it works for you as well as it does for us!
Is it possible for me to access the internet while my husband drives in the remote outback with Starlink?
Hey Sushi, on a normal installation the dish would be removed and stored inside for travel. The mounting system used is not designed for use whilst in motion. That said, many are setting them in more secure mounting setups (modifying the dish by removing the pole and mounting flat) and are having great success using while in motion. However… Starlink terms state that in use motion is not approved (it actually wasn’t approved by the FCC in the US) and they have been testing a system that disables the dish when moving faster than 12kmh. So far this has not been tried in Australia, however they will be releasing an official in motion version in Australia in the near future (no release date yet) that will be a lot more expensive. As in, around $4,000 to buy and $750 a month!
So bottom line, we don’t even try to use while in motion, we just use the mobile data on our phone. If we are out of mobile service we have to wait til we pull up and plug in the dish.
Great article and has helped me a lot in my considerations. Well done. A quick question. If I went the RV version do i need any additional hardware to set up wifi so both wife and myself can access. Thanks again.
Hey Bob, thanks for the nice words! The basic router supplied with the kit doesn’t get a great range, but does allow for connection of up to 255 devices via wireless. So bottom line, no need for anything extra. We still have the basic kit as provided and have our work computers, phones, TV etc all connected and then any friends camped close by we share the password with them too!
This is the best article I’ve read for setup in caravan. Thank you for taking the time to share and help those, like me, wanting to work on the road but not good with this sort of thing.
Thanks Michelle! If there is anything I haven’t covered or a question you have I haven’t answered feel free to ask away. I do plan to keep extending the article as we go, though I haven’t made any updates for a little while now as we haven’t changed anything!
Fantastic article great information
Thanks Peter, your kind words are much appreciated!
Excellent article / blog Dave Baker, thanks for posting this. Answered all my questions. I think someone is now selling a kit to connect to 12v to eliminate the inverter.
Hey Tony, Yes, there are various 12v options available currently. However, all of them only provide the 48v power for the dish and require you to provide your own 12v router and power to suit. They also require you to cut the cable and fit a shielded RJ45 connector. It’s not impossible by any means, but still beyond the scope of the average user. Even having a backround of Electronic Engineering and IT, I still run a basic 200w inverter to power mine! I may soon change that to a 48v and 12v supply to run the existing router direct from DC to remove the inverter whan not required (saves probably 1.5 amps continuous). Stay tuned for that one!
Great advice.
G’day mate. Top effort
Question. What is the purpose of connect 12v up aswell inside the router?
I have a 48v system in van and going to connect straight to this and use starlink as router. I assume the output for 12v is for external router? Cheers
Hey Jack, the standard Starlink router has two separate components in it. A power supply and a wifi router. The power supply provides 12v (at max 1.25 amps) for the wifi router 48v running up the cable to the dish. So in your case you can connect the 48v line direct from your batteries to power the dish, but will need a 48 down to 12v converter to run the Starlink router. The internal power supply in the wifi section of the router only has an input tolerance of about 9 to 16 volts.
Hope that makes sense, shout out if not.
Hi Dave and thanks for posting such good info including videos about starlink. Just about to order the discounted hardware ($199), will worry about the tech stuff later. I holiday 3 months a year towing a van and the rest of the time at home in Port Douglas. I’m hoping to get some great use from starling, both on the road and at home. Should be easier thanks to your postings, thanks again.
Thanks for the kind words Steve. You will love it, one of the best purchases we have made on the road
Cheers, Dave.
Having any issues with unregulated 12v power? Being it could be 10-15v
Would also like to talk with you about potentially you creating some of these in to Facebook post for my 12v group with +85k members
Hey Zane, we are using LiFePO4 batteries which have a very narrow voltage range compared to AGM, 20% capacity is around 12.9v and float is 13.6, max charging 14.2v. The internal regulator in the Router power supply is designed for inputs of 9 to 16v, as all outputs from it are 3v or below, so even a pretty flat AGM would not be an issue! The 12 to 48v adaptor we used is also designed for inputs of 10 to 30v, no issues there either. With connecting that 48v adaptor to the output of the internal 48v power supply, we also tap into the output rectifier capacitors which helps smooth out any ripples that may come from the Chinese boost adaptor. The whole system has been running perfectly for the last 6 months with no issues whatsoever.
Happy to jump into the group too, I am a member of at least one 12v group, but I think there are a few out there now!
Cheers, Dave.
Thank you so much for this detailed information. We are currently looking into getting this. Where we camp at Christmas and for a lot of weekends away, we have almost no phone reception or internet. Was hoping to be able to get tv as well as internet. We bought a satking receiver but that needed internet, so that was returned. I also have a Cell Wi-Fi thing, which is also hopeless.
I am hoping the downloads are unlimited.
Do you know how many devices you can connect?
Also how away can you be to get reception?
Our granddaughter was injured and is in a brace for another 4 weeks, their van is about 6m from ours where we camp, so our main aim is to give her internet whilst away.
Hey Suzanne, Yes, Downloads are unlimited, and pretty fast! We average around 350Gb a month with work and play. You can have up to 128 devices connected so that should not be an issue. Depending where the wireless router is located in the van will dictate what the range outside the van is like, but generally the van next door shouldnt have any problems. I have the router in the outdoor cabinet on the awning side, which is a hole in the aluminimum side cladding. Perfect signal inside the van and under the awning of course, works up to about 50m away on that side reliably, other side of the van maybe 30m, inside the van next door is OK, depending on windows! The WiFi range on the Starlink router is definitely not one of its strengths. If its a composite/fibreglass wall van then it wont degrade the range much at all. If you were going to be further away than that, you can buy the optional Ethernet Adaptor and connect a decent wireless access point, some of those could get coverage over the whole park! But generally if we are sharing with a friend parked near us they dont have any problems.
I hope that all makes sense, but feel free to ask any other quesitons of course. Cheers, Dave.
Thank you
Hi there, many thanks for outstanding info, am looking into at the moment, happy travels
Hi Dave
Just found your blog and going through. We are in the process of setting up our caravan to run starlink on 12v haven’t purchased the dish yet my question which I hope you might be able to help with We don’t plan on using till the end of year if I purchase hardware from say Harvey Norman can I leave activation till we are ready to go. My understanding is you have 30 days from purchase to activate if you buy through starlink have read this doesn’t apply when you purchase from a registered retailer. Would very much like your views on this. We have found your blog to be very helpful. Thanking you
Hey Julie, thanks for the kind words! Correct if purchased from Starlink directly they are already activated and billing commences either 30 days from dispatch date or the day you first set it up, which ever comes first. If you buy it retail and they don’t set up the account then it’s not possible for billing to start, I believe you have to go into the Starlink website and create your account first to then activate it. So yes, should be fine, but just check they are not creating the account for you. Cheers, Dave.
Hi Dave, thanks for the great article, it’s helped a lot. I plan to purchase the starlink in preparation for travel in a few months. I currently use a mini modem for working from home and purchase data through Boost. I would like to be able to cancel this and just take the starlink with me, but unsure if I will need it. From your article it sounds like the starlink will be all I need, is this correct? Also, do you leave it out overnight or when away from camp. I would be worried about having it stolen.
Thanks again Dave
Hey Marg,
Thanks for the kind words! Correct with the mini modem on Boost, we had a Telstra 4GX modem and two mobiles, we cancelled the 4GX modem and swapped both our phones to Boost. When out of mobile phone range calls are still made and received using the wifi connection to Starlink through our normal phone account. We just went with $200 annual plans (I think they are $230 now?) Which gives us each 130gig of mobile data a year if we need it. Occasionally we might pack up the laptops and head to a cafe to work for a few hours, so use the mobile data there.
As for the dish, yep we always leave it out. Admittedly ours is usually up a pole, but honestly I have not heard of one being stolen in Australia on any of the groups. Have heard of a few being run over, hence why mines usually up a pole! Hope that helps,
Cheers, Dave.
PS, don’t forget the referrer link for a free month too up the top of the post!
Thanks Dave, used the link for the free month when I ordered a few days ago. Pleased to hear they don’t get stolen too often. Enjoy your travels.