
Packing up to go!
So you are almost ready to go, how do you make sure everything is remembered to be done, and what do you actually need to do?
For the safety of all your gear, you need to make sure all your stuff inside the caravan stays where you put it, stays cold, stays closed etc. So before we go, we do a quick walk around with a check list. We have been using a small app for both Android and Apple called AnyList. Its free and brilliant! We can share the lists between each other and each tick off the things we have done. You can set the list to hide things once ticked off (we do this for the shopping lists – I have a general one, a Bunnings one etc.) but on the pack up list we set it not to hide them, so it just puts a line through it. Next time to pack up you simply whip through the list tapping each line to uncross them off.

So what do we check? This is our current list, I have it broken up into categories as well (the information in brackets is just to explain to you what that item is referring to):
INSIDE:
- Fan against the wall (its a sirocco fan)
- Pantry slide out clicked in
- Plates secured in cupboard (we have bamboo and crockery, this is to make sure the heavy stuff is on the bottom)
- Roof hatches closed x 2
- En-suite sliding door latched top and bottom
- Shower shelves empty
- Shower rose secured
- En-suite roof hatches closed
- Shower door latched
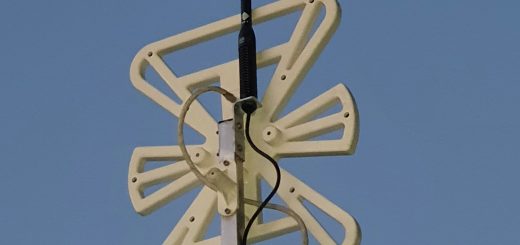
- TV Antenna down
- TV secured on bed
- Windows closed/latched and all blinds open
- All cupboard doors latched (push each door, they often ‘click’ closed)
INSIDE ELECTRICALS:
- Black switch on (12v master to keep fridge running)
- Fridge set to 12v and both doors latched
- Hot water off (gas and electric switches)
- Microwave plate secured
- Mobile Booster off
- Starlink switched off (ours is 12v powered)
- Water pump off
OUTSIDE:
- Awning knobs, latches and straps x 2
- Bikes strapped and security cables
- Gas bottles off x 2
- BBQ strapped down (ours is in the tunnel boot on a slide, I strap it to the slide so it doesn’t bounce)
- TPMS booster on (ours is in the outside TV cabinet plugged into the 12v socket)
- Power lead disconnected and stored
- Water filter sealed and stored (short hose from in to out to stop dust getting in)
- Water hose sealed and packed (we use a joiner to join the ends together so no dust gets in hose)
- Water inlet sealed (we have a blanked off hose connector to seal from dust when travelling)
- Grey water hose stored
- External hatches x5 and Table secured
- Inverter circuit breaker off
- Ladder strapped and security cable attached
- Legs up and secured
- Leg pads x 4 packed away
- Wheel ramps, chocks and any timber blocks packed away
- Starlink dish and cable packed and secured
- Diesel heater main switch and fuel tap off.
OK, so now all the van is sorted, we just hitch up and go! Right? Well, not so fast… First I will assume you already know how it all connects and works, but there are some tips and guides for hitching up.
Hold on though – before you swing the car around the front and start connecting things, bear in mind your fellow travellers in the park around you. A couple of days ago I witnessed someone packing up, they brought the car around the front and started connecting it up before packing up water, power, tables and chairs etc. When they finally pulled away their car had been blocking the only road in for over half an hour, with no easy way around them. Be courteous, have everything ready to go so you are only blocking the road for as short a time as possible.
Ok, now lets hookup! Firstly, your van should be sit level or slightly (very slightly) nose down. Your vehicle should also be sitting reasonably level when the van is connected. If the car is not close to level get it there first then work on the van. The tow vehicle may need to have the rear suspension upgraded (stronger springs or air bags for example) and may require a weight distribution hitch (that’s covered in a separate post).
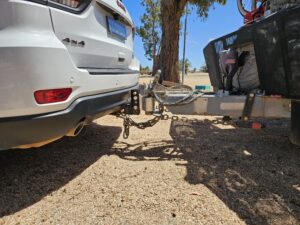
Next connect your chains to the tow vehicle with your shackles or hooks (that discussion is covered in another post!) – you should cross them and you need to make them as short as possible. Ahh what? why do we cross them? A few reasons have been given over the years, and it is not a law (despite what many will have you believe) but a strong recommendation. The main point of the chains is to stop the van from flying off on its own, and in the process if the tow ball broke for example (or you forget to latch it..) the draw bar drops and the chains hold it off from digging into the ground – that part of not hitting the ground actually is in the rules. The shorter the chains, the less likely the drawbar will hit the ground.
From a personal view, crossing the chains allows you to make them shorter and less varying, as when you turn they don’t change much as the diagonally opposite attachment points stay relatively similar distances apart when turning. If you don’t cross them over, one side mounting points gets closer and the other gets further apart. This means you need to have chains long enough for that maximum distance and will cause them to hang lower when driving straight. To shorten the chains, simply move the hackly one or more link back from the end until it sits the way you want. I saw a neighbour at the last van park hook up and had the D shackles on the ends of the chains. He did have them crossed, but they were only about 50mm off the ground as he drove off with a massive loop of chains hanging down. The drawbar, if it came unhitched, would be dragging on the ground half a metre behind the tow ball!
This is ours, if you look closely the D Shackle is connected to the 4th link from the end to get the chain to the desired length. Honestly though, if you look at our chain length and the height from the car attachment point to the ground, even as short as possible, I don’t think our chains will actually stop the drawbar hitting the ground, and there is absolutely nothing I can do about it. Fortunately I think the chassis designer realises this and has the the bottom edge chamfered back at 45° instead of square cut, so hopefully it will slide across the ground instead of digging in, should the unthinkable ever happen! I should add it has happened to me with a boat, those chains were short enough and it bounced off the ball and swung under the car dinting the bumper, but stayed attached. So yes, it can happen… (the hitch was latched, but the adjustment was far enough out that over a bump the hitch bounced off the ball – so it pays to check the adjustment once in a while too)
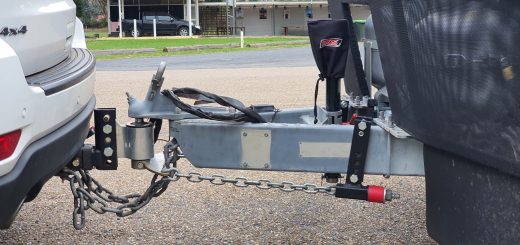
Next consideration is the emergency brake over ride control. On a van over 2t, this is a mandatory requirement. A cable attaches from the activating device on the draw bar to the tow vehicle. If the drawbar comes free of the tow bar, AND the safety chains break, this cable pulls the pin out of the activating device and holds the brakes on the caravan on for up to an hour. So where do you attach this cable? Attaching to the safety chains like old mate with the long chains did – useless. The most likely possibility for both the chains and the tow ball to fail at the same time is the tow bar mounting bolts failing and the whole tow bar falls off. If the cable is connected to the chains, the D shackles or the tow bar, it stays attached. If attached directly to the car itself, it will pull the pin out. On our car (the Jeep Grand Cherokee) I crawled under and found some 8mm nuts welded to the body not being used. I simply made a short cable from some spare 3mm wire rope I had lying about, one end attached to a bolt in that spare nut, the other end hangs down just low enough to see and hook the safety cable on to. On other vehicles you will have to look for yourself to see what you can attach to, but bottom line it should not be attached to the tow-bar or safety chains.
Hope this helps someone, and of course please don’t hesitate to shout out to add some more or ask me questions. I will add more as I think of it!
Recent Comments