

Weight Distribution Hitch (WDH)
Let me preface this post by saying a Weight Distribution Hitch (WDH) is not a solution for a poorly loaded caravan or a vehicle with sagging suspension. They are also not suitable for every situation, every vehicle, or every caravan and are for on-road use only. Some Vehicle Manufacturers warn to never use one as it may damage the vehicle, whilst others recommend them to ensure stability and handling when towing larger caravans. We are in the latter, with Jeep recommending them if towing over 5000lb (2267kg).
Always consult the vehicle manufacturer and seek professional advice before committing to installing or not installing a WDH.
With the ball weight of the caravan being in the high range (250kg +), Jeep recommends using a Weight Distribution Hitch (WDH) to assist in reducing the rear axle load and increasing the load on the front axles. This provides much better braking and steering, especially in an emergency manoeuvre. (The Jeep recommendation is for when towing over 5000lb or 2267kg)
There are many arguments stating that the Jeep has self levelling rear shocks or even full self levelling air suspension (like ours) so doesn’t need a WDH, or fitting rear spring helpers / air bags is all you need. No, not necessarily. The leverage effect of the tow ball is approximately 1.4:1 on a Grand Cherokee (and up to 1.5:1 on some utes). This is due to the tow ball being behind the rear axle and it acting like a big lever. Pushing down on the tow ball lifts up on the front wheels. In the Jeeps case, 300kg ball weight with a 1.4:1 leverage affect adds 400kg to the rear axle and removes 100kg from the fronts.
Now in addition to this static weight, in an emergency braking situation your van wheels are close to locked up and the top of the van is trying to keep going, resulting in the van trying to push the drawbar down hard. This will add even more ‘weight’ to the tow ball, providing more lift to the front end when you need more weight for braking and steering.
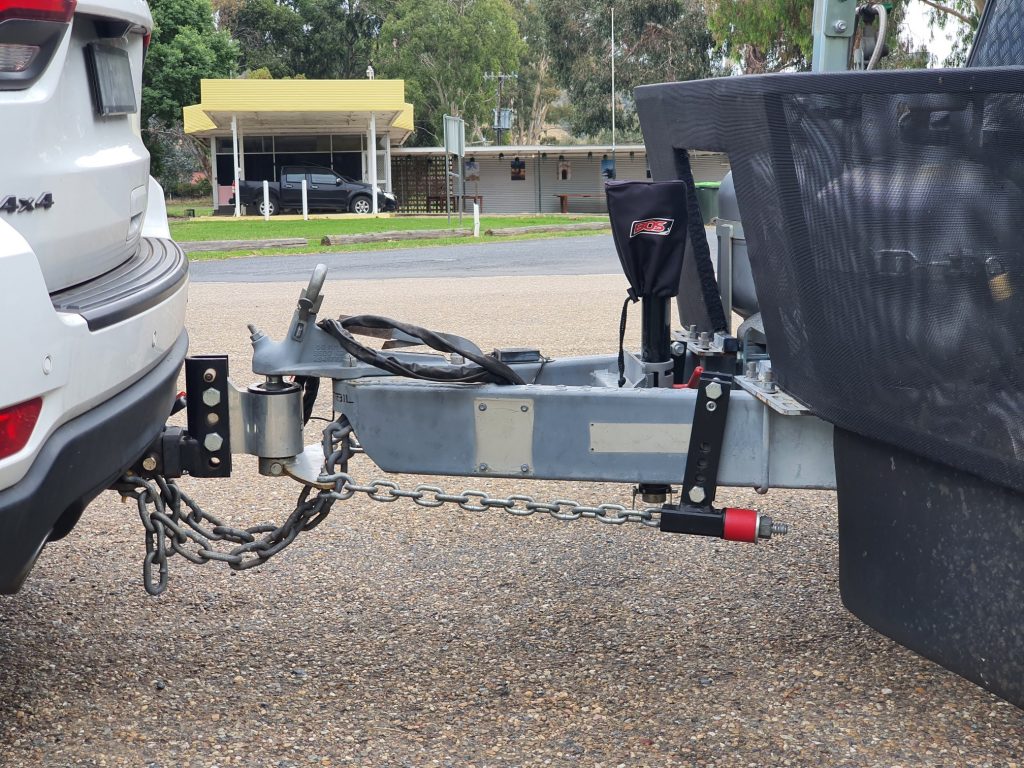
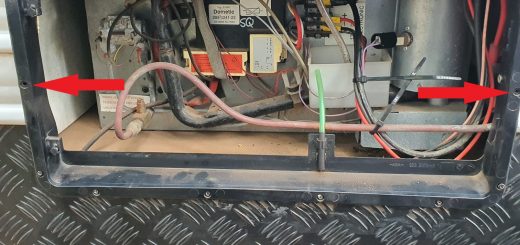
A WDH is trying to rotate the tow bar assembly forward to try and force more weight onto the front wheels, which by default removes some from the rear. After having the Hayman Reese WDH in the past and the limitations of not being able to turn tight corners, I decided to try the Andersen Hitch – picked up ours from Everything Caravans as they had the best price I could find at the time. You can see in the picture below, the caravan hitch is sitting on the ball and below that is a set of chains also attached back to the draw bar. At the caravan end of the chains is a compressible poly block, acting as a compression spring. The nut holding the chain in place behind the poly block is done up to the point the poly block is firm, then approximately another 5 turns when the car and van are on level ground. This pulls on the chains quite hard, in turn pushing the hitch forward against the tow ball.
The net result its its trying to twist the tow bar assembly top forward and bottom backwards. Since the tow bar is firmly attached to the vehicle, this twisting force is transferred to the vehicle, trying to push the front down.
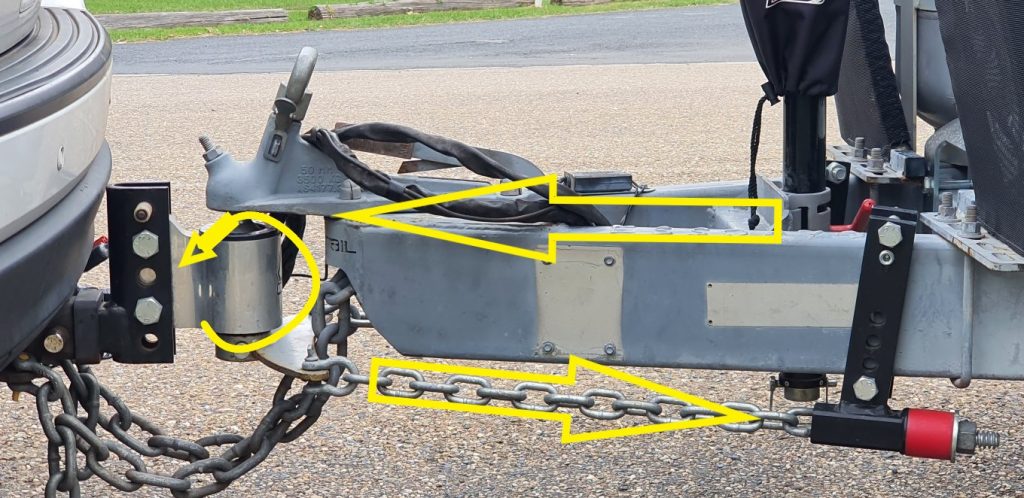
The advantage of the Andersen hitch over the Hayman Reese style is the tow ball assembly is rotating left and right as the van moves left and right (swaying, cornering). The ball is one piece from the top of the ball to the bottom where the triangular plate for the chains attaches, through the aluminium block with nylon bushing to provide resistance to it rotating. This provides a damping affect and provides anti sway assistance.
Secondly, as the the triangle plate at the bottom turns with the van, there is nothing to hit the drawbar on sharp turns or reversing, two manoeuvres the Hayman Reese design says you should not do.
Just for comparison, this is the Hayman Reese style (I say style as there are now several brands with similar design concepts)
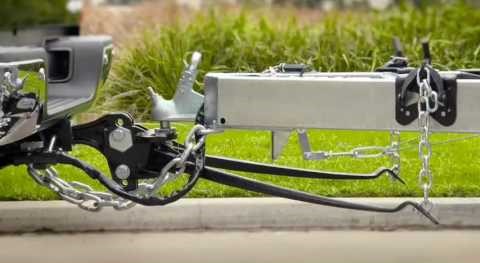
Here you can see the long spring bars held in the tow hitch assembly. The chains on the caravan draw bar are pulling up on the ends of the bars, trying to rotate the tow bar assembly top forward, the same net effect as the Andersen. These bars can not be swung too far to the side or they hit the mounting point of the other bar and foul, this is why tight turns are a no go. There are also various styles depending on the height of your caravan hitch compared to the frame (notice this hitch is mounted at the bottom of the van A Frame and mine is at the top of the A Frame).
Setup:
Once you have worked out that you need a WDH, the next step is to set it up properly. The manufacturers general setup guide is to measure the gap from the front tyre to the mudguard, then hook up the van and measure it again. This is how high the front has lifted due to the leverage effect. Starting point is to now attach the WDH bars or chains and tension them until that gap has reduced by half. You are not aiming to reduce it completely back to original. If the rear is still sagging too much, then either the tow ball weight is too high for you vehicle, or your rear suspension is not up to the task. This is where rear airbags or new rear springs can be of assistance. Altering the rear suspension though will only fix the rear ride height, it does not adjust the weight distribution on the tow vehicle.
On the Jeep with its full air suspension, I started the engine then first set mine to Sports Mode which sets it to Aero height, about 12mm lower than normal ride height (as I tow in sports mode). Then on the uConnect system I set it to tyre change mode which disables the air suspension system and stops it trying to level the vehicle. It will stay in tyre change mode until you exceed 12kmh. Then I follow the setup procedure as per above.
The best way to make the final or fine tuning adjustments to the WDH is with the aid of either a weighbridge or individual scales, measuring the front and rear axles sets of the tow vehicle to ensure the rear is below the limits set by the manufacturer, this is where most people will find they first pass the limits. I will cover the weights and how to measure them under a separate post, this is the link to it.
Modifications:
I found the hitch stuck out too far and I was concerned about the additional leverage for sideways movement (every little bit helps as they say!). So I had a new hole drilled into the shank that brought it in until almost touching the rear bumper – as it is in all the photos above. This was done after contacting the manufacturer to assess if this was an acceptable modification. As the shank was solid 2in steel and already had 3 mounting hole options they agreed it was no issue at all if done properly (which is was!).
This is what it looked like prior to the adjustment, you can see it sat about 80mm further out from the rear bumper. You may also notice since this photo I have moved the shank in, lifted the ball height and I used to sit the safety chains over the triangle plate, however I found on tight turns after raising the ball height they were interfering with the rotation of the plate, so now I pass them under the triangle plate.
DISCLAIMER: I am not saying that a WDH is the be all and end all, it does not fix a badly loaded caravan or tow vehicle and it is not always the best solution. Some manufacturers state they must NOT be used at all, others (like Jeep) say either they MUST (2014 to 2016) or they RECOMMEND them (2017 onwards). As per the first paragrah ALWAYS seek professional advice (and not Facebook advice) before comitting to use or not use a WDH.
Update: ok so 55,00km into our travels (guessing about 38,000 with the van based on Wiki Camps trip planner) the nylon cone in the hitch wore to the point it needed replacing (metal to metal squeal). A quick email to the warranty guys in Australia (Titan RV) and 2 replacement cones were on their way from Brisbane to Broome at no charge! Apparently these things have a life time warranty! Parts arrived in just a couple of days, 20 minute job to replace it and good as new.
With ESC and electric brakes on our van, your biggest issues with not using WDH when towing are mitigated. With WDH it is recommended that it be disconnected when reversing, off road and even when crossing dips in road surfaces. Ours has even been a problem leaving a service station where the driveway had a steep drop to the road level. This is totally impractical and the strain put on the chassis of both the van and tow vehicle can be enormous when this happens. I have stopped using whd but the my weight should always be below 2.4 ton
Hey Brendan, thanks for the comments. I would beg to differ on one point, you say the biggest issues not using a WDH are mitigated when using ESC. The ESC is designed to stop trailer sway, the WDH is designed to redistribute the tow ball weight from the rear to the front axle. So two completely different issues. Some WDH do have an anti sway effect like the Andersen, but none is a replacement for a good working ESC system – 5hat I totally agree with. However I don’t have an ESC, I just use the manual brake over ride control should I feel any sway. Also the ride is so much smoother with the WDH removing a lot of the porpoising effect of the heavy ball weight. Below 200kg though would probably not be a huge difference with or without. Another point, the Anderson hitch doesn’t have a problem with reversing or very tight corners, but will still have the issue with deep dips. Though so far we have not had an issue at all in the last 2 years and 55,000km travelled around this big brown land!
Cheers, Dave.