

Water pump upgrade
We had the original water pump in our van since we bought it, thinking damn this thing is loud, and many others say the same. I had tried completely encasing it in offcuts from an old memory foam mattress topper – very little difference, but we put up with it.
2 years on the road later and many people on the Essential Caravans Facebook page are raving on about a new pump they fitted and how quiet it is. Took a while, but thought what the hell, so many people raving about them it must be better.
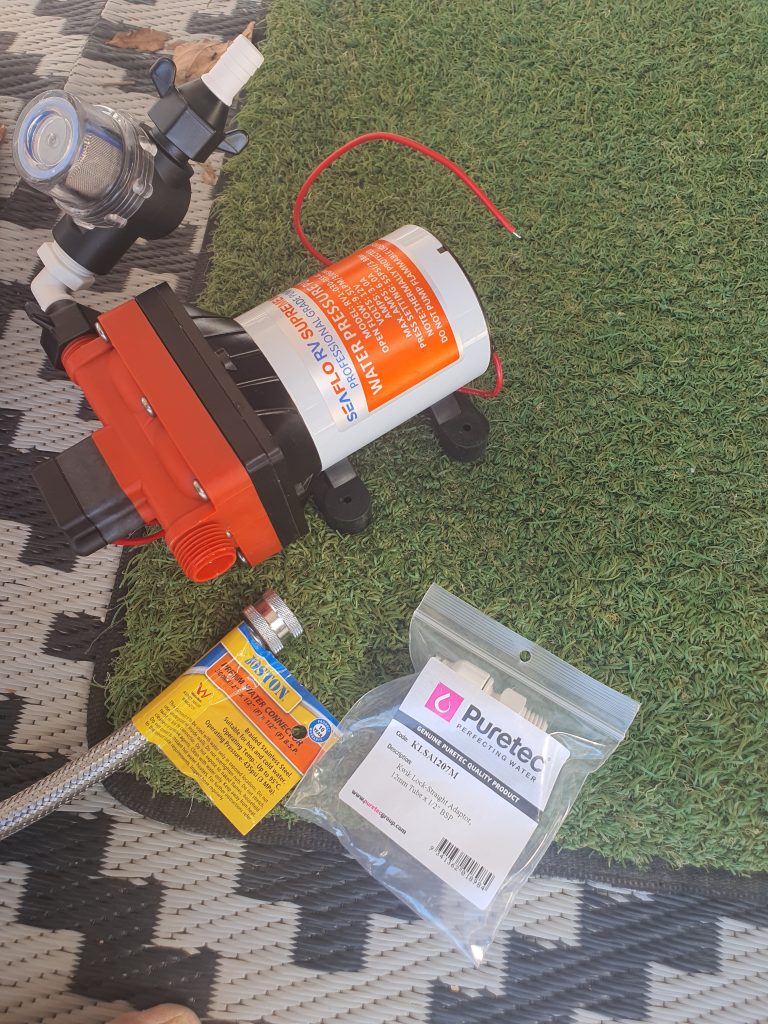
So we ordered the Seaflo 42 series 12v pump – there seems to be 2 versions, the RV1-030-055-42 RV Extreme and the SFDP1-030-055-42 Professional Series. The odd thing is no reseller seems to be able to tell why the difference. The RV1 Extreme is rated at 9.5 litres per minute with 3 year warranty, the SFDP1 at 11 litres per minute with 2 year warranty. However I ordered the SFDP1 and received the RV1, another person ordered the RV1 and received the SFDP1… So who knows. The RV Extreme is also not listed on the Seaflo website, so no idea what is going on there!
Anyway, decided to keep and use the 9.5L version as I had it in my hands – spoiler alert – the sound it makes is so much less than the original I had to have the cupboard door open to hear it working – seriously… As usual I grabbed it online from Everything Caravans – their delivery services have never let me down and happy to recommend a team that works well
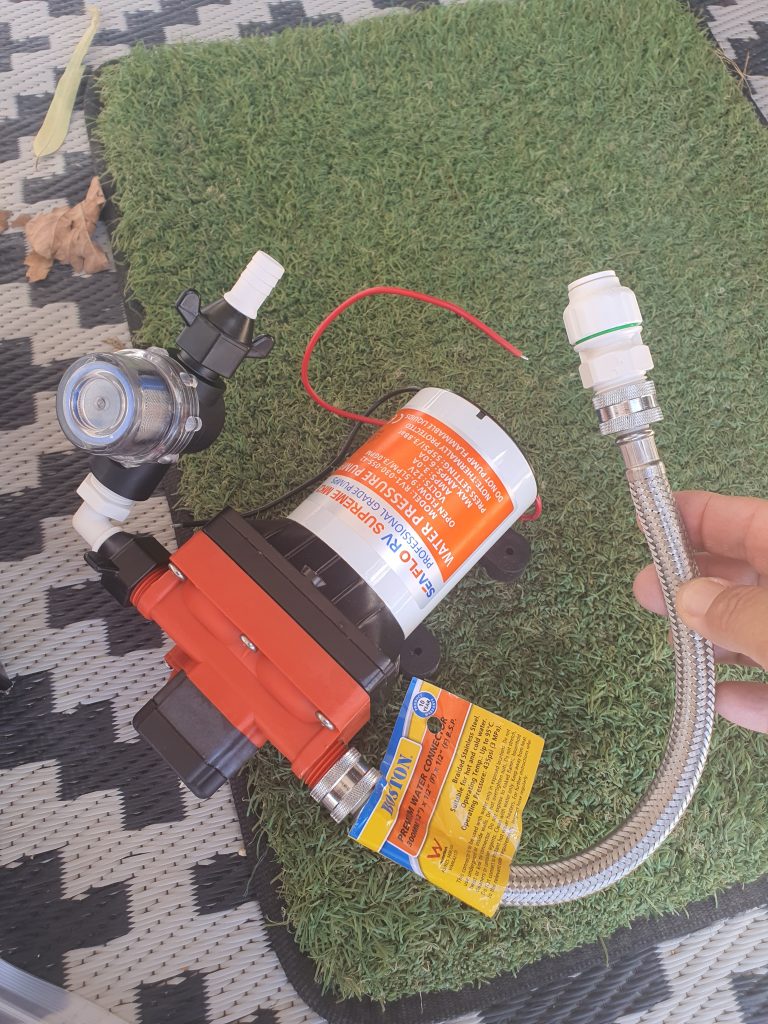
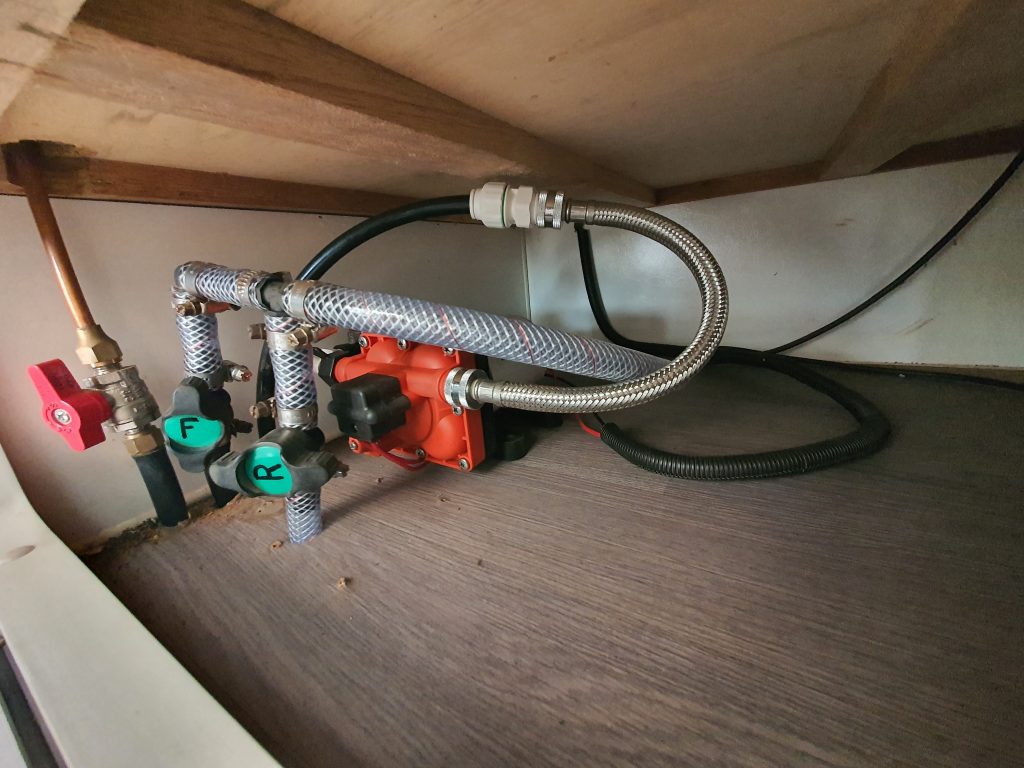
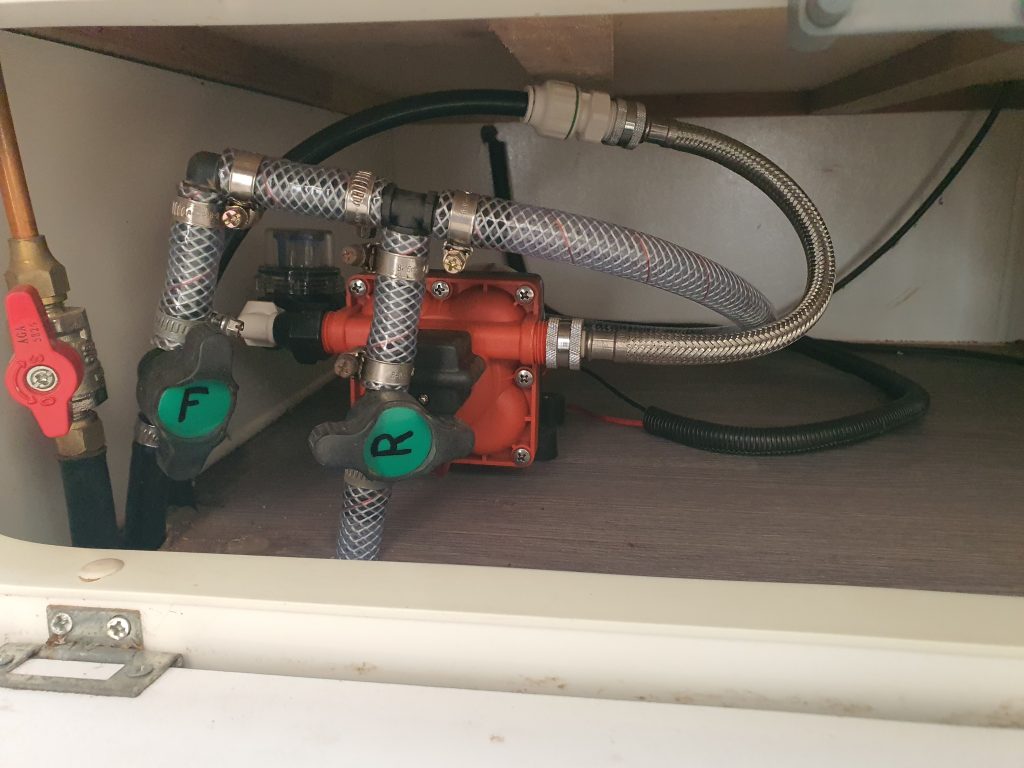
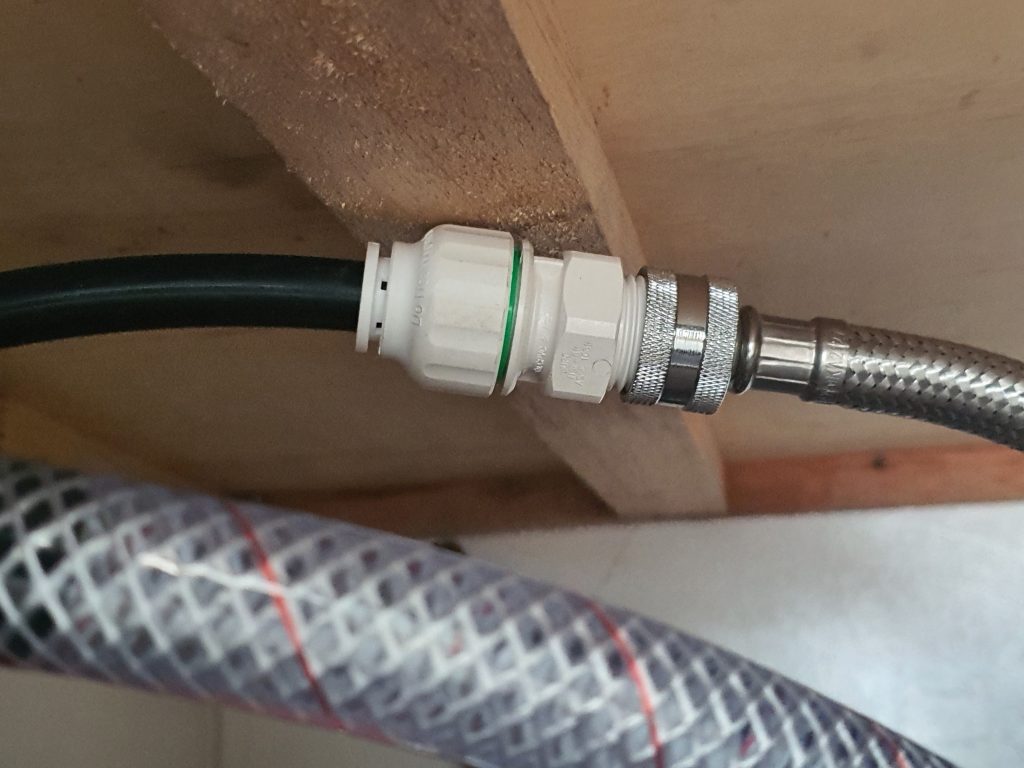
Installation is fairly straight forward, depending on your existing pump and the hoses used, you may need to invest in some fittings, I did. Input hose is connected directly to the fitting provided (right angle NPT female to NPT male joiner, filter, NPT to 13mm hose adaptor), but the output needed to connect to the 12mm rigid caravan hose. For this you need a 12mm John Guest one end, 1/2in NPT the other for the pump. To fit directly to the pump would require a female NPT connector, I used a 12 inch flexible braided hose with 1/2in BSP female each end (standard plumbing flexible hose) so needed a 12mm John Guest to Male BSP (our existing pump had a John Guest to Female NPT connector that could have screwed directly to the new pump, but it out the hose connector off in the wrong direction). Note, the NPT (National Pipe Thread) and BSP (British Standard Pipe) are generally noted as not being compatible, however these ones fitted intermixed together perfectly fine and seal well. The thread is the same size, just a slightly different shape and the NPT is usually tapered (though the pump is labelled NPT but is not tapered, but instead uses an interference fit of the inner pipes). I suspect although the pump is labelled as being NPT it is in fact BSP (as its not tapered and fits perfectly with BSP adaptors)
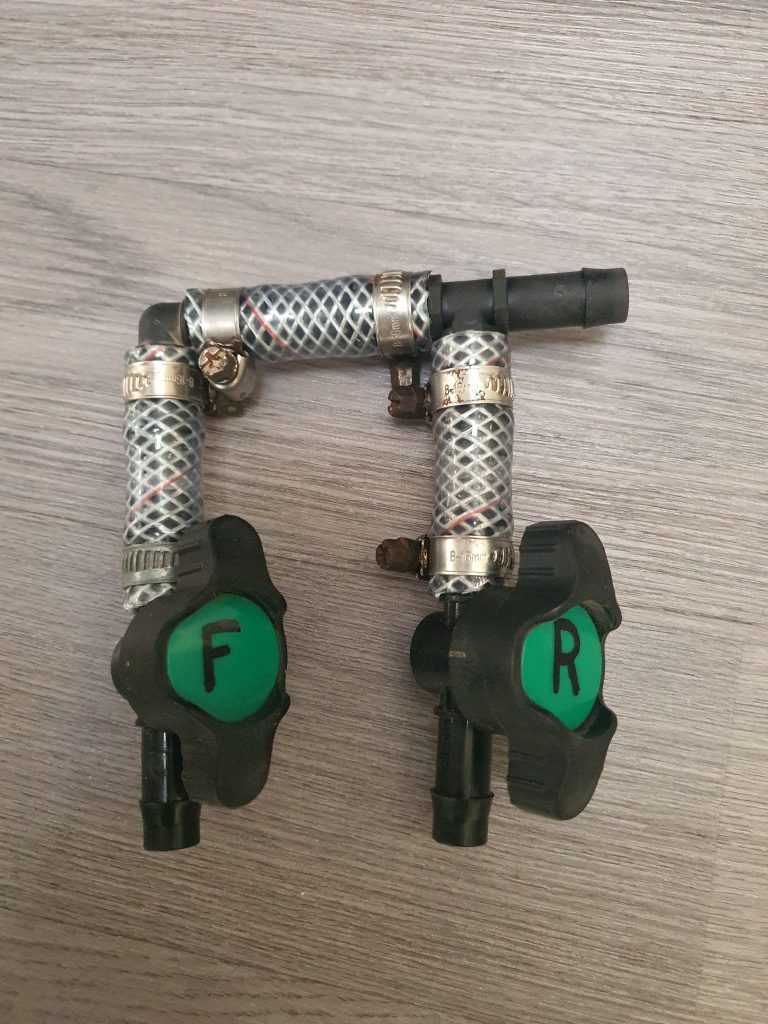
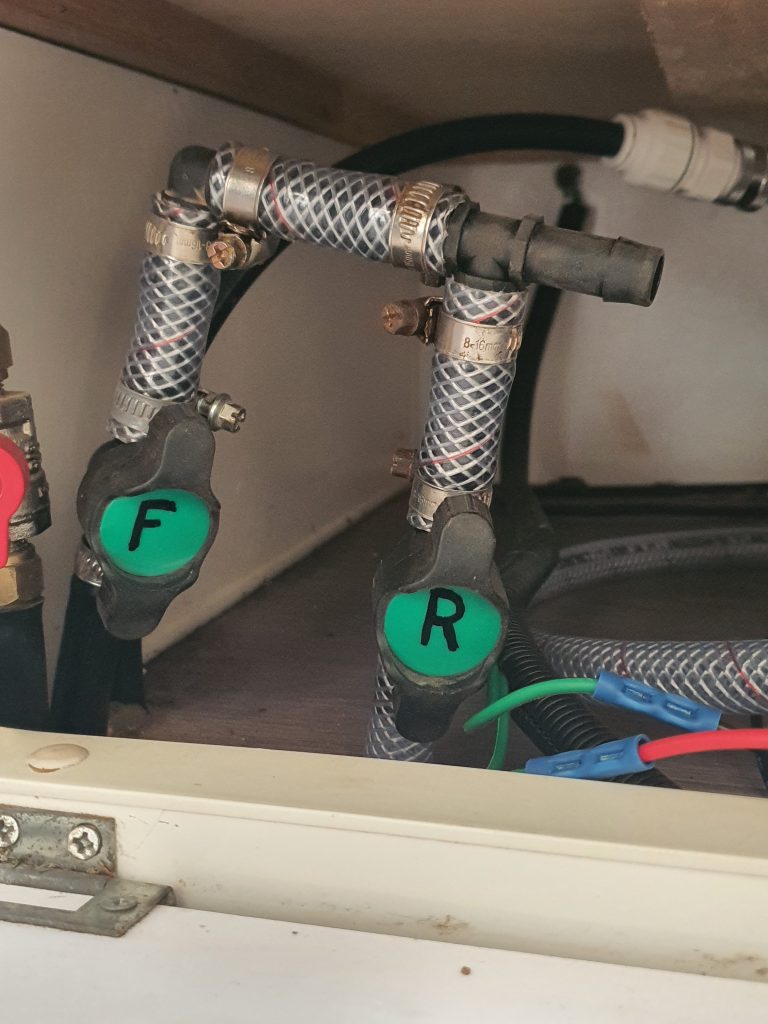
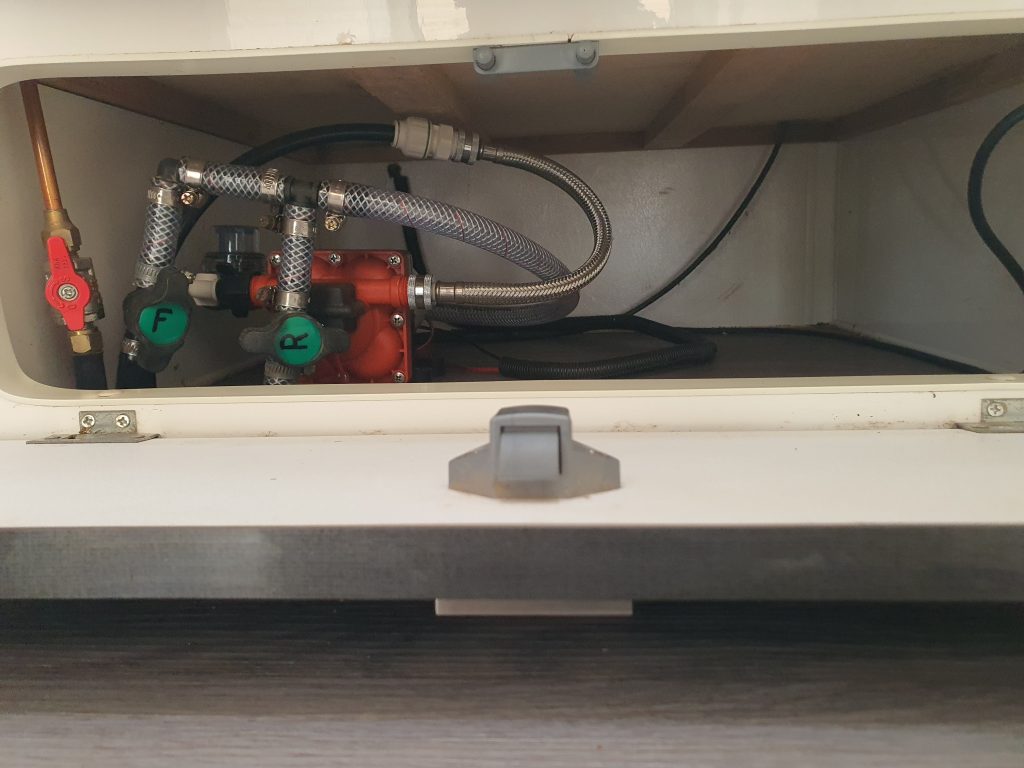
While I was at it, I had some spare food grade hose left over from when I purchased the water bladder, more than enough to run a second line from the water tanks the pump location (our pump is indoors under the fridge). This allowed me to pull the taps off the tank end of the hoses and relocated them to just near the pump so I can swap tanks from inside the van easily (sick of going out in the cold or wet or hot to kneel down on whatever dirt and rocks to reach the taps to change over – silly design). That rework took me a couple of hours in the afternoon, everything now ready to instal the new pump. New pump only took about an hour and a half, but I did have extra hoses to connect, secure and seal around the floor hole due to the tap relocation.
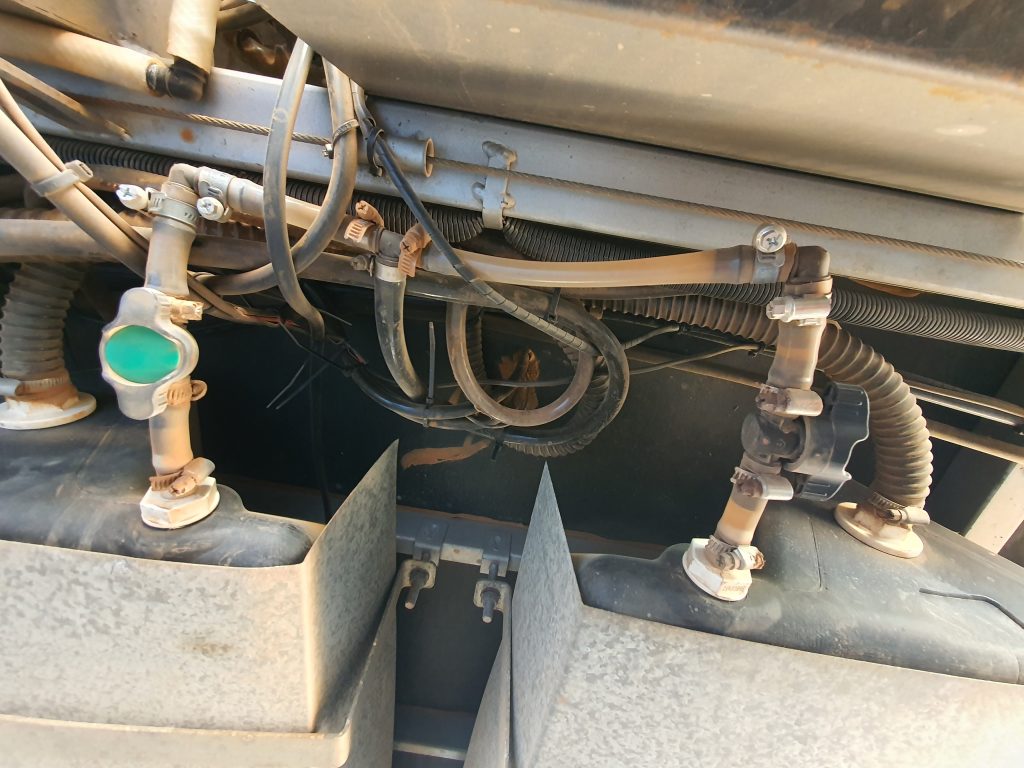
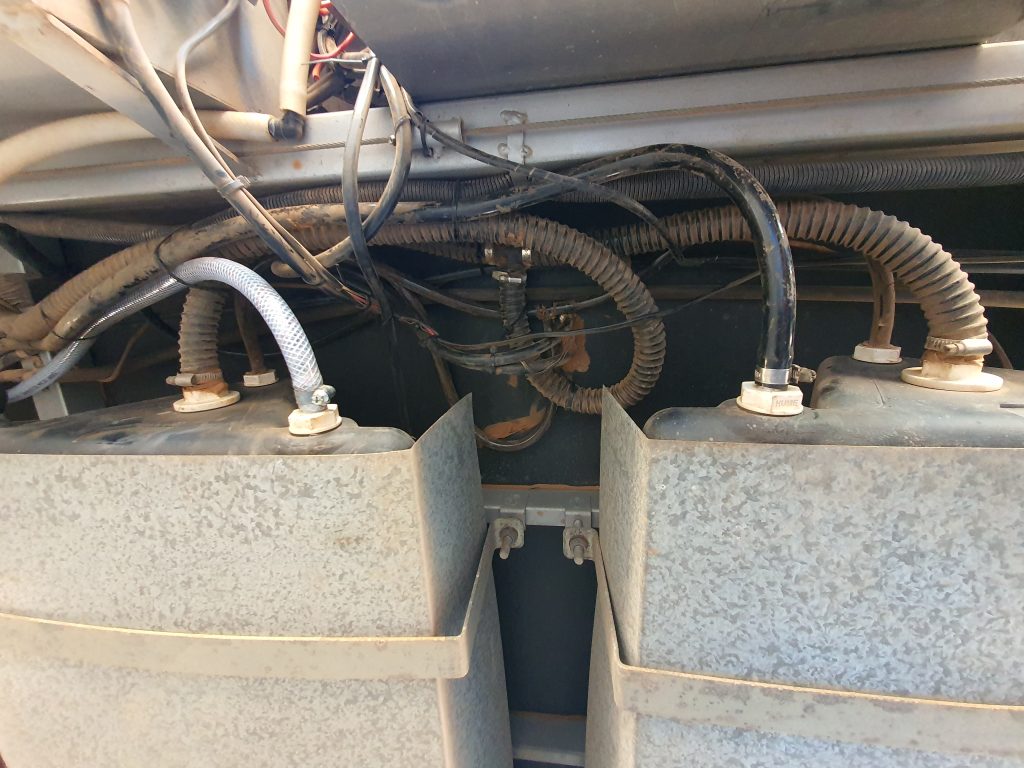
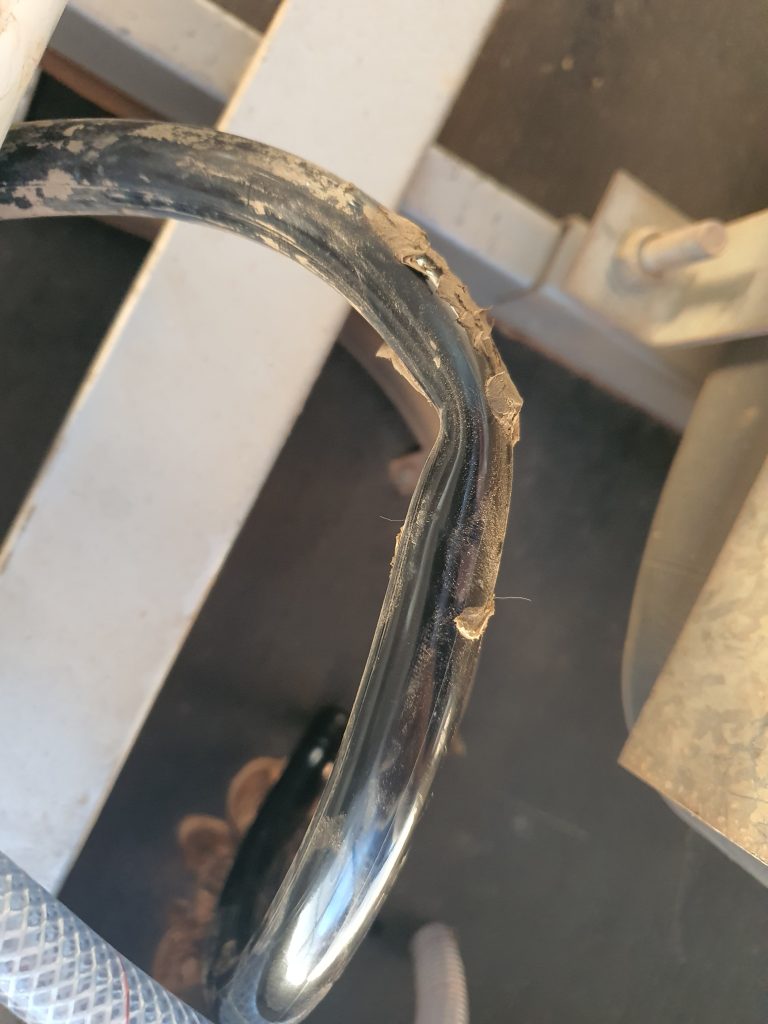
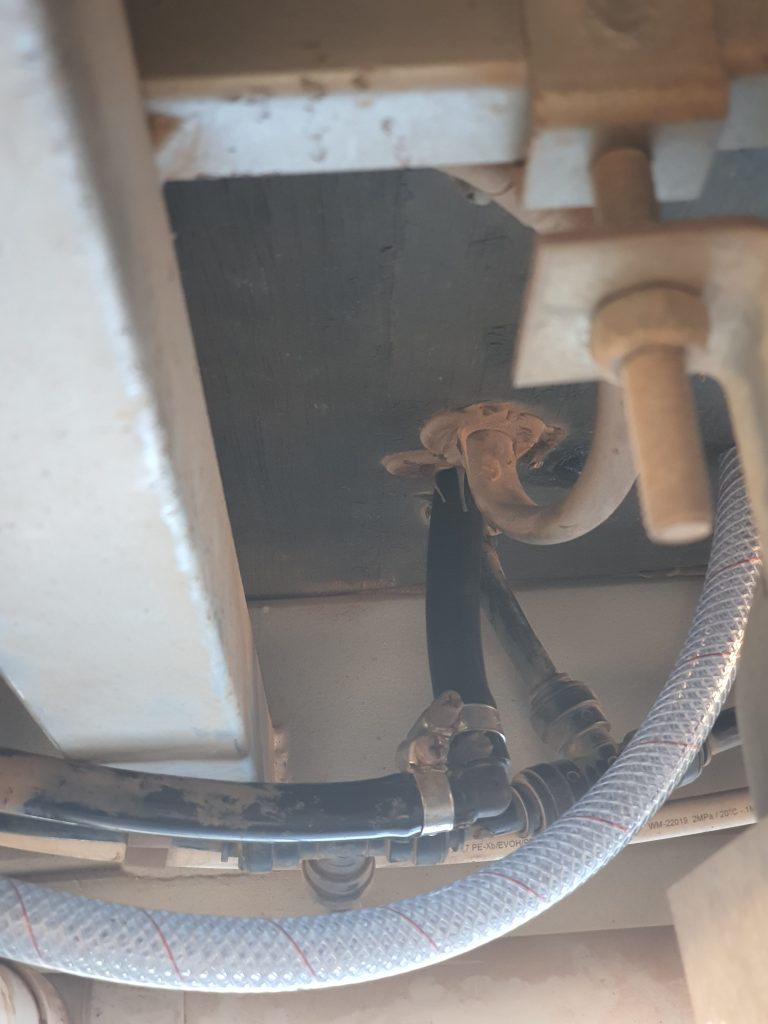
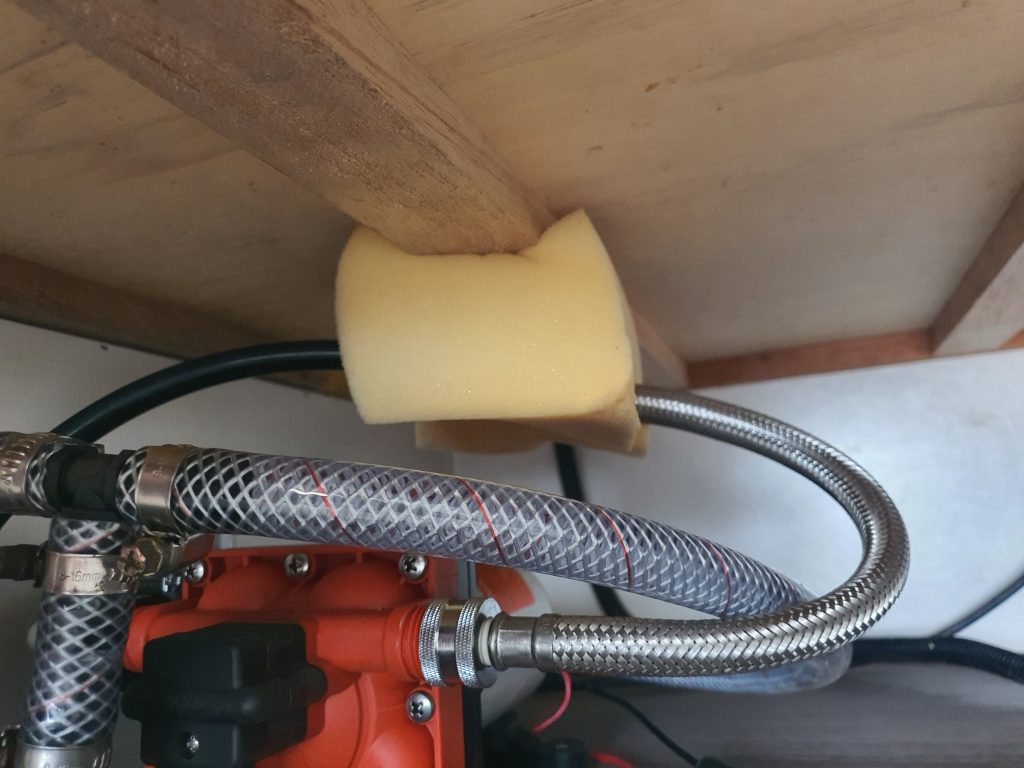
While changing this around I noticed the factory instal had the plastic water pipe from the tanks going through a 50mm gap between the floor and a cross beam, then within 50mm of the beam bending it 90 degrees to enter straight up through the floor of the van, almost closing off the incoming tank water where it bent – not sure how it was working. I had a spare elbow connector after relocating the taps so cut out the damaged section, so I moved the water pipe to below the frame beam and used the elbow to neatly turn the pipe up through the floor (photos below).
Tips for along the way.
- Turn off the mains water, then open the tap outside on the drawbar and let the water run until it stops dripping, removing all pressure from the lines – make sure to wait until it stops before turning the tap off, or when you undo the output line at the pump it will squirt everywhere (ask me how I know that…). You can just leave it open so no pressure at all.
- If you leave it open when undoing the pump lines the only issue will be all the water will run out of the lines and you would need to bleed the air out once finished (just means after connecting mains pressure, leaving each tap on for a good 30 seconds or more until no more air spurts out).
- The fittings on the pump inlet side are designed to seal without the use of plumbing tape, there is no water pressure as its the inlet with the pump sucking the water in. However if not sealed it may suck in air.
- Outlet side is also designed to seal without plumbing tape, however as I used the 12in flexible extension, this has a rubber seal inbuilt each end so no problems of leaks there.
- All fittings were done up by hand, no tools used. Firm by hand.
- Original screws for our pump were too short for the new pump, needed about 25mm screws, had some countersunk ones that pulled into the rubber nicely.
- Work out exactly how you will fit the pump in and how the hoses will attach so you can make one (not 3) trips to the hardware store, and cut the right hose length first time..
- Check how the power wires are connected on the original pump before cutting the wires – our power lead was a green figure 8 cable with a black stripe on the negative. Blue crimp joiners work well for this size cable. Make sure to cut the soldered ends off the pump wires and strip if you are using crimp joiners (crimps don’t work very well on the solid soldered wires). If you are using screw terminal connections you can leave the soldered ends.
- After installation is complete, have someone go outside and turn on mains water pressure whilst you stay inside to ensure the outlet side of the pump does not leak (it will be under mains pressure).
- Turn main pressure off again and turn pump on, wait for it to build up pressure and stop running, then turn on each tap for at least 30 seconds to purge all air from the lines. That’s every tap – sink, shower, toilet, outside etc. Washing machine probably will be OK, but that doesn’t hurt to do to. Note that the pump may not switch off for a while when first fired up due to the amount of air in the incoming and outgoing pipes.
- After connecting mains power, our outlet pipe straightened up a bit and the joiner was hitting the top. When testing it was knocking against the timber. A block of foam with a slice for the hose to sit in and all good.
- We are now getting knocking in other pipes around the van as the pump cuts in and out at low water flow setting on taps, I am looking to instal the 0.75 Litre SeaFlo Accumulator tank which is pressurised and is designed to stop or at least reduce dramatically this behaviour – will update when that happens. (Updated at the end of the post)
- After all this we realised we now only had a water gauge on the front tank, so we decided to fit a water flow meter to monitor usage properly. I have created a separate post for that here.I have created a separate post for that here.
Photos to complete the story:

UPDATE: the new pump was a lot quieter, but it was cycling several times a second causing lights to flicker and pipes to hammer. Even with that is was still way quieter than the original! So I thought I would try an Accumulator Tank.
Basically a water storage tank pressurised with air. The pump fills the tank until it reaches the cut-off pressure of the pump then the air pressure forces the water out until the pressure drops below the pump switch pressure level.
The net result is when having a shower on low flow rates (conserving water) the pump was chattering and pipes hammering. Now the pump turns on for a few seconds, then off for a few seconds and is super quiet now.
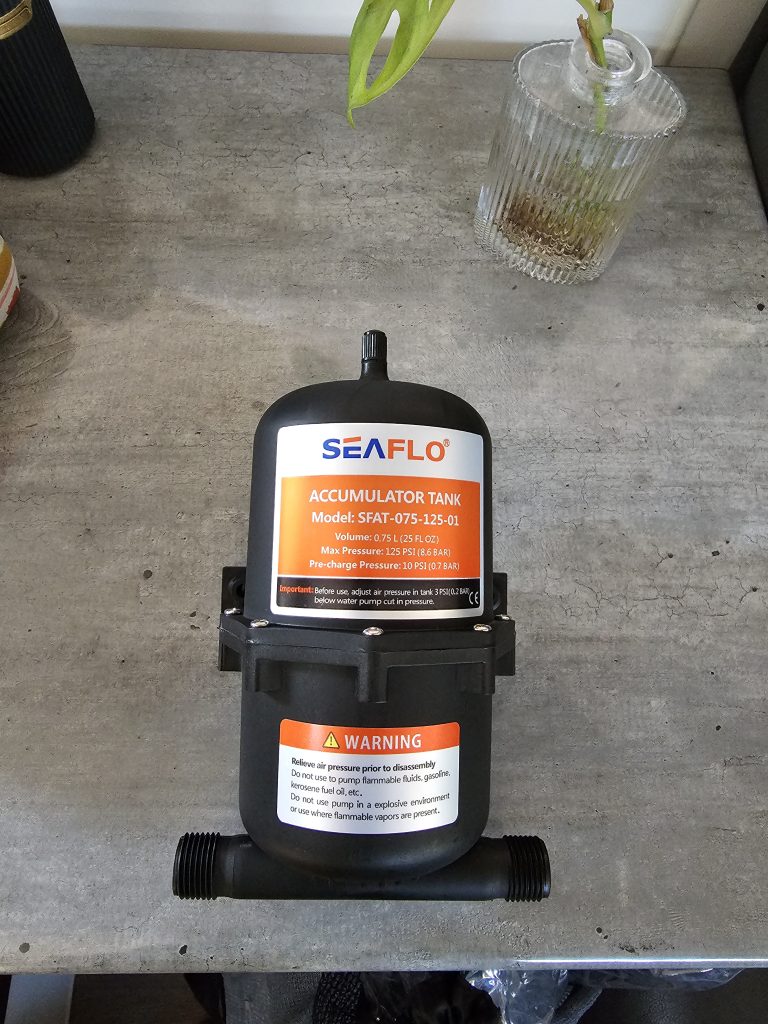

Before install of course I read the instructions that said pump up the tank (standard car valve on top) to 3 or 4 PSI below the pump cut-in pressure. On the pump the only things it says is 55psi, but I believe now that’s actually the cut out pressure. So I set it to 50psi, installed, and it was only marginally better.
Thought it should have been better so I emailed the manufacturer and they replied a couple of weeks later to set it to 20 to 25 PSI. Did that today and OMG…. Now it’s silent..
Install was simple, I removed the flexible hose I installed from the pump outlet and attached that to the tank, then another flexible hose from the tank back to the pump. That’s it.
EDIT… When you mount the tank, make sure the outlet is the highest point so that air will flow out and not be trapped in the tank. Air in the tank makes it act exactly the same as without the tank installed! I reinstalled the tank as per the last photo above, the inlet and outlet at the top, slightly angled so the side I am using for the outlet slightly higher.

Thank you, I am not handy but after your instructions I feel I could have a go
Thanks for the kind words Bill, shout out if you have any questions.
Cheers, Dave.
Thanks Dave, very informative and just the information I was looking for. Very much appreciated 👍
Cheers, Gary
Thanks Gary, only thing I have not put in the blog yet (which reminds me…) is the accumulator Tank should be mounted vertically, or horizontally with the outlet side highest to allow air to escape and not get trapped. Trapped air makes the pump act exactly the same as before the tank was installed.
Cheers, Dave
(Will go update the post now!)
Great info Dave.
I too have an essential with the noisy pump and am in the process of doing this upgrade with the pump and accumulator (and internal tank switching valves!!). So I have it installed and am testing it and have an issue. The new pump works when I turn it on at the trek display – it fills the accumulator and water flows out the taps. But when I turn the taps off the pump keeps going (as expected) to fill the accumulator and eventually stops. When I open the taps water flows but the pump never turns on again. Water flows from the accumulator until it runs out then the flow gradually stops. The pump won’t cut in again automatically. If I turn the pump off and on again at the trek display it starts OK and water flows until I turn off the tap and then once the pump stops it won’t start again.
Did you have any issue like this during your install?
I have tried various pressures (10, 0, 40, and the 20psi that worked for you).
My next steps are to bypass the accumulator to check that the pump works ok on its own. If thats OK i will try mounting the accumulator at an angle (its currently horizontal) to see if that fixes it. Just looking for clues as its a pain faffing around under the fridge 😁
Totally agree with the under fridge location – what a pain!! However, that actually sounds like a faulty pump. The output of the pump has a pressure switch that turns off when the pressure in pump output side reaches 55PSI, turning the pump back on when it drops a certain amount below that (not sure on the actual figure). So when the pump turns on first it pumps until pressure in the pipes and/or the accumulator reaches 55psi, then it stops. When a tap turns on the pressure drops and the pump should switch back on and pumps as the pressure is being releived by the tap being on. When the tap turns off, pressure builds back up to 55PSI turning off the pump. If yours is not switching back on there is either an issue with the pressure switch or the pressure switch setting – there is a screw adjustment, but the instructions say to not adjust unless doing so under instruction of the supplier/service agent. The accumulator wont cause it to not turn back on, so whilst I can’t see it causing any issue whatsoever, its probably not a bad ide just to rule out, then contact the supplier and see what they say. If you have 0 PSI in the tank, it will act like a 0.75L air bubble taking forever to build up enough pressure to shut off the pump, 40 or above PSI it acts like its not even installed and pump shut of very quickly. Neither end will stop it turning back on. No installation configuration I can think of apart from a faulty pump switch will do what you describe!
Hope that makes sense/helps! Cheers, Dave.